Introduction
Quick Start
Creating a New Show
Patching Some Fixtures
Live Channel Control
Recording Groups, Palettes & Submasters
Recording & Updating Cues
Adding an Effect
Saving the Show
Running a Show
Front Panel
Displays
Top Menu Bar
Selection Keys & Options
Selection Tool
On & Out
Home
Fan
Hi Light
Park
Undo
Release
Recording Buttons & Options
Groups
Palettes
FX Library
Copy
Command Line
Master Fade Time & Page Controls
Windows
Options Menu
More Options
New Show
Open File
Save & Save File...
Connect to remote
Backup Now
Task Scheduler
User Security
Reports
Patch
Patch Window
Command Line Patching
Drag & Drop Patching
Patch Detail Pane
Options Menu
RDM
Edit Menu
Soft Keys
MUTE Output
Visible Columns
Search Bar
DMX Outputs Pane
Fixture List Pane
Patch Encoders
Matrix Editor
Controlling Fixtures
Color
Selecting Channels
Intensity
Attributes
Releasing Channels
Channel Commands
Additional Channel Commands
Parking
Groups & Palettes
Groups & Palettes Editor
Group Details
Group Details Pane
Channels Overview Tab
Channel Grid
Matrix
DMX
Timing & Delay
Add/Delete
Palettes
Effects
Groups & Palettes Editor
Editor Grid
Editor Options
Select Active Button
New & Delete Group
Filtering
Group Mode Commands
Palette Types
Recording & Updating Groups & Palettes - Command Line
Record Group
Record Palette
Palette Windows
Generic Palettes
Effects
FX Playbacks
FX Editor
FX Editor
Creating new effects
Simple lighting chase
Timeline effect
Profile effect
Matrix Effect
Paint Box Effect
Media Playback Effect
DMX Recorder
Deleting an Effect
Effect Options
Effect Library
Effect Editor Controls
Recording Chases
Submasters
Cues & Cue Lists
Cue List Editor
Cue List Details
Cue List Editor
Cue Lists
Cue List Grid
Options Menu
Cue Options
Cue List Execution
Recording & Updating Cues - Command Line
Recording Cues - UI
Update Cue - UI
Cue Timing
Follow and Link
Copying & Moving Cues
Deleting Cues
Cue Execution Commands
Playbacks
Shortcuts
Snapshots
Magic Sheets
Macros
Blind
System Properties
System (DMX)
System Settings
Show Defaults
Network Access
Appearance
System Properties
Basic Mode Settings
Registration
Visualizer
Remote Options
Media Settings
Special Shortcuts
NEO Console Debug
Keyboard Shortcuts
External Triggers
MIDI
MIDI Control
MIDI Learn
Note Triggers
Note Velocity
Control Change Events
Timecode (MTC) / Clock
MIDI Show Control
Debug Messages
External Triggers
Line in
Timecode A & B
mySQL
Vision.Net
Contacts
OSC
ChilliNet
iCAN
Typing into the Command Line
Command Syntax Conventions
Saving & Loading Show Files
Programming Commands
Communication with external systems
Timing Commands
Software Updates
NEO Tips & Tricks
- All Categories
- Quick Start
- Live Channel Control
Live Channel Control

If the [LIVE] key is not illuminated in red, press it to switch to Live mode.
Selecting Channels Manually – In Classic or Magic Sheet view, a selected channel is denoted by a red border surrounding its icon. There are several ways to select a channel or channels for live control:
- Single channel – Ex: [6] [ENTER] would select Channel 6; Tapping Channel 6’s icon on the touchscreen would also select it.
- Single cell of a multi-cell fixture – Ex: [1][1][.][5] [ENTER] would select cell 5 of Fixture 11.
- A range of channels – Ex: [7] [THRU] [1][0] [ENTER] would select Channels 7-10; [1][1][.][1] [THRU] [1][1][.][1][2] [ENTER] would select all 12 cells of Fixture 11.
- Combinations of single channels and channel lists using the [+] & [-] keys to add or subtract from the selection.
- Once a list of channels has been selected, the [NEXT] & [LAST] keys can be used to cycle through the list.
- If certain fields of the patch map (Position, Purpose, Color, etc.) have been populated with meaningful data, the [SELECT] key can be used to display selections. These are repeated in the Quick Select Bar if visible on the Main Display.
- More options will be available after cues & palettes have been recorded.
Setting Intensity and Attributes – Once a channel has been selected, the controls associated with the instrument patched to it can be adjusted as desired.
Intensity – Most patched channels have an intensity parameter which can be set in various ways:
- Using the console’s Level Wheel to adjust the intensity up or down
- [@] (Value) [ENTER] – Ex: [3] [@] [4][5] [ENTER] would set Channels 3’s intensity to 45%.
- Using the [ON], [FULL], & [OUT] keys to set “ON” level, Full level or zero level respectively.
- If [ACTIVE SELECT MODE] is On (key legend is red), the intensity of a channel when selected will be the “ON” level – Ex: [7] [ENTER] would select Channel 7 and set its intensity to the “ON” level (default is 100% or FL).
- Using the [UP] & [DOWN] keys – Ex: Channel 8 at 50%; [UP] – Increase intensity by the “Up/Down” level (default is 5%). Action may be repeated to raise or lower the intensity by steps.
- [SHIFT] + [@] ‘DMX’ (value) [ENTER] – Treats the value as a DMX level in the range of 0 – 255. The channel will show the intensity in the nearest percent value from 0 – FL. Ex: [9] [SHIFT] + [@] ‘DMX’ [6][4] [ENTER] would set Channel 9’s intensity to 25%.
- [COPY] ‘COPY FROM’ (channel #) [ENTER] – Ex; Channel 8 at 50%; [9] [COPY] ‘COPY FROM’ [8] would set Channel 9’s intensity to 50%.
Attributes – Intelligent fixtures have profiles that are included with the NEO software. When an intelligent fixture is patched to a channel, its profile is read in and its controls (attributes) are assigned to families and encoder wheel groups. The standard attribute families are Intensity, Position, Color, Beam, Edge, and Utility. The NEO Console provides keys and encoder wheels to aid in selecting and setting attributes.
Setting Color Example
[7] [@] [5][0] [ENTER] – Select a color fixture and set its intensity to 50%.
[COLOR] – Press attribute family key to show controls available to set the color. The Side Bar Cue List on the Main Display will show the color controls for the fixture:
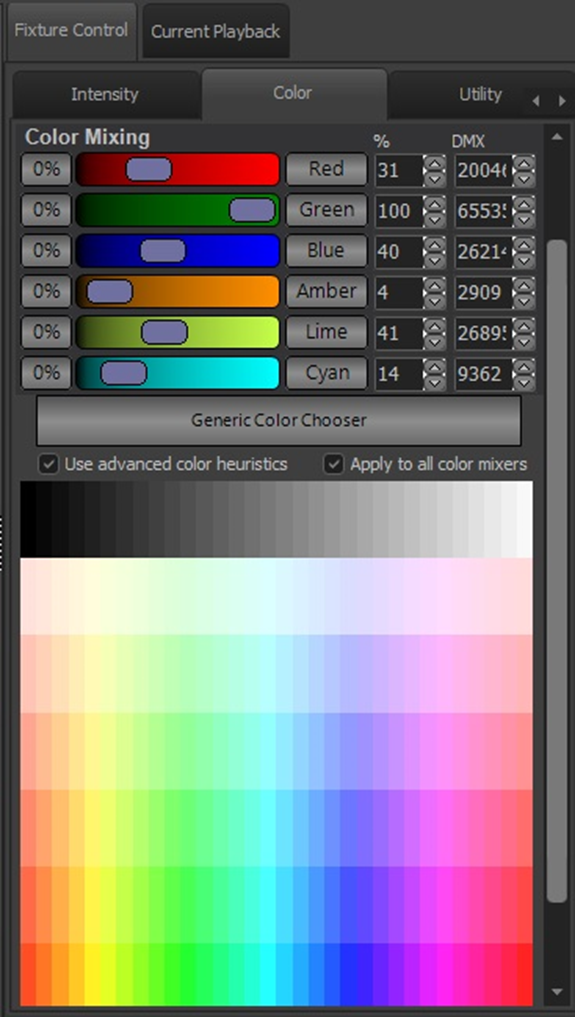
In addition to these touchscreen controls, the encoder wheels can be used to dial in the desired color. Pressing the [COLOR] key will advance the wheel assignments through all the controls available which are shown in the small displays to the left of the wheels.
The approximate color can be set using the color palette in the lower section of the color control and then adjusted using the sliders or the encoder wheels.
The Generic Color Chooser is another option. When tapped, this button opens a new window showing various methods of choosing the desired color, such as RGB, CMY, CIE, color filters, etc.
The NEO software contains a list of the color filters (gels) available from the major brands and may be applied directly via console keys to the color mixer of a fixture. The form of the command is [@] [COLOR] (brand #) [.] (gel #). The assigned brand numbers are 1 = Apollo, 2 = GAM, 3 = Lee, 4 = Rosco.
Example: [8] [@] [COLOR] [4][.][4][7] [ENTER] – Set the color mixer of Fixture 8 to match a Rosco #47 gel.
Setting Position Example
[1][2] [@] [7][0] [ENTER] – Select a moving fixture and set its intensity to 70%.
[POSITION] - Press attribute family key to show controls available to set the position:
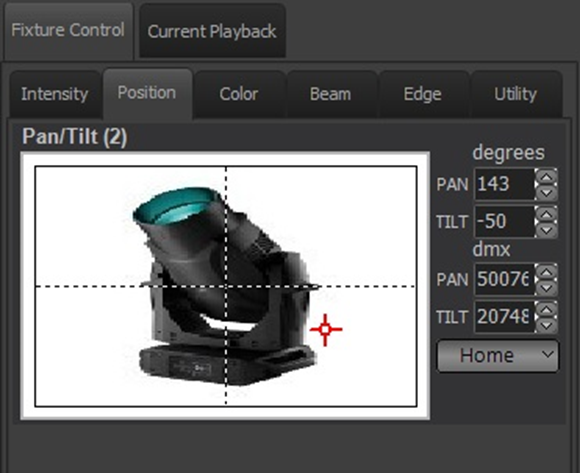
In addition to these touchscreen controls, the encoder wheels can be used to dial in the desired position. This fixture has zoom and iris controls available by pressing the [EDGE] key. Finer control over pan & tilt is available by holding down the [SHIFT] key while turning the encoders.
Releasing Channel Control – Pressing [RELEASE] will reset any manual levels set on the currently selected fixtures. A second [RELEASE] will reset any previously selected fixtures. When released, the fixtures will return to whatever active levels they were at before (cue, submaster, etc.). If no other active levels are in control, the fixtures will return to the defaults set in the fixture profiles or patch.
[SHIFT] + [RELEASE] will reset all control.
Attributes may be selectively released by using family keys in conjunction with [RELEASE]. See Command Keys for more information.