Introduction
Quick Start
Creating a New Show
Patching Some Fixtures
Live Channel Control
Recording Groups, Palettes & Submasters
Recording & Updating Cues
Adding an Effect
Saving the Show
Running a Show
Front Panel
Displays
Top Menu Bar
Selection Keys & Options
Selection Tool
On & Out
Home
Fan
Hi Light
Park
Undo
Release
Recording Buttons & Options
Groups
Palettes
FX Library
Copy
Command Line
Master Fade Time & Page Controls
Windows
Options Menu
More Options
New Show
Open File
Save & Save File...
Connect to remote
Backup Now
Task Scheduler
User Security
Reports
Patch
Patch Window
Command Line Patching
Drag & Drop Patching
Patch Detail Pane
Options Menu
RDM
Edit Menu
Soft Keys
MUTE Output
Visible Columns
Search Bar
DMX Outputs Pane
Fixture List Pane
Patch Encoders
Matrix Editor
Controlling Fixtures
Color
Selecting Channels
Intensity
Attributes
Releasing Channels
Channel Commands
Additional Channel Commands
Parking
Groups & Palettes
Groups & Palettes Editor
Group Details
Group Details Pane
Channels Overview Tab
Channel Grid
Matrix
DMX
Timing & Delay
Add/Delete
Palettes
Effects
Groups & Palettes Editor
Editor Grid
Editor Options
Select Active Button
New & Delete Group
Filtering
Group Mode Commands
Palette Types
Recording & Updating Groups & Palettes - Command Line
Record Group
Record Palette
Palette Windows
Generic Palettes
Effects
FX Playbacks
FX Editor
FX Editor
Creating new effects
Simple lighting chase
Timeline effect
Profile effect
Matrix Effect
Paint Box Effect
Media Playback Effect
DMX Recorder
Deleting an Effect
Effect Options
Effect Library
Effect Editor Controls
Recording Chases
Submasters
Cues & Cue Lists
Cue List Editor
Cue List Details
Cue List Editor
Cue Lists
Cue List Grid
Options Menu
Cue Options
Cue List Execution
Recording & Updating Cues - Command Line
Recording Cues - UI
Update Cue - UI
Cue Timing
Follow and Link
Copying & Moving Cues
Deleting Cues
Cue Execution Commands
Playbacks
Shortcuts
Snapshots
Magic Sheets
Macros
Blind
System Properties
System (DMX)
System Settings
Show Defaults
Network Access
Appearance
System Properties
Basic Mode Settings
Registration
Visualizer
Remote Options
Media Settings
Special Shortcuts
NEO Console Debug
Keyboard Shortcuts
External Triggers
MIDI
MIDI Control
MIDI Learn
Note Triggers
Note Velocity
Control Change Events
Timecode (MTC) / Clock
MIDI Show Control
Debug Messages
External Triggers
Line in
Timecode A & B
mySQL
Vision.Net
Contacts
OSC
ChilliNet
iCAN
Typing into the Command Line
Command Syntax Conventions
Saving & Loading Show Files
Programming Commands
Communication with external systems
Timing Commands
Software Updates
NEO Tips & Tricks
- All Categories
- Patch
- DMX Outputs Pane
DMX Outputs Pane

The DMX Outputs pane shows a grid of the DMX addresses for the selected universe (tabs along the top). The squares in the grid show the patch status of each address and can be used to capture and set the DMX value. Below is a partial view of the pane showing some of its features:
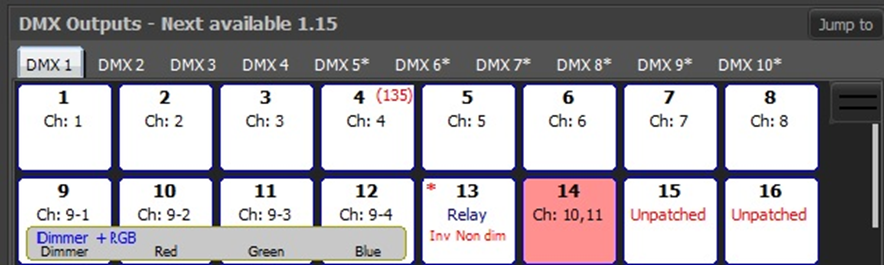
As shown above, the first 8 addresses (outputs) of DMX Universe 1 are standard dimmers patched 1:1 and each square shows the channel to which it is assigned. Addresses 9-12 are assigned to Channel 9 and are the attributes of a simple RGB LED fixture chosen from the Fixture List. The function of each address is shown in the grey box that spans the address squares with the fixture type in blue on the top.
Address 13 is shown with an asterisk in the upper left corner and is labelled “Relay” to indicate it has been assigned to at least one channel in its “Relay” column. See the section on “Patch Detail” for more information.
Address 14 is highlighted with a red background as a warning to indicate that it is being controlled by more than one channel. The output level of such an address will be determined by whichever channel is the latest to set its value. This can often be an indicator of an error in patching and should be evaluated and it is likely that the overlapping patch should be resolved.
Addresses 15-16 have not been assigned and are therefore shown as “Unpatched” in red.
Address 4 shows a number in red in the top right corner of its square. This indicates that the Address (Output) has been “captured” and the number indicates the DMX value (range of 0-255) to which it has been set. An address can be captured by right-clicking on its square and then using the mouse’s scroll wheel to adjust the level, which starts at the “ON” level set in System Properties. In a live lighting rig, capturing an address can be used to identify the instrument connected to the selected dimmer.
Captured outputs are locked out of any control by other means from within NEO and must be released to regain control. An individual output can be released by right-clicking it again. To release all addresses from the patch window, select “Release All Captured Dimmers” from the Options Menu in the Patch Detail pane.
NEO Notes & Tips: Dimmers may be captured and released from the Command Line. See Setting Channel Levels for more information.
If you have more universes configured than can be shown across the top, there will be arrow buttons on the right to shift the list. In addition, the “Jump To” button will display a dialog where the desired universe may be entered which will shift the list and select it.