Editor Grid

The columns in the grid are explained below. The entries can be ordered alphabetically or numerically in ascending or descending order by clicking on the column headings. Also, columns can be rearranged by clicking and dragging the column labels.
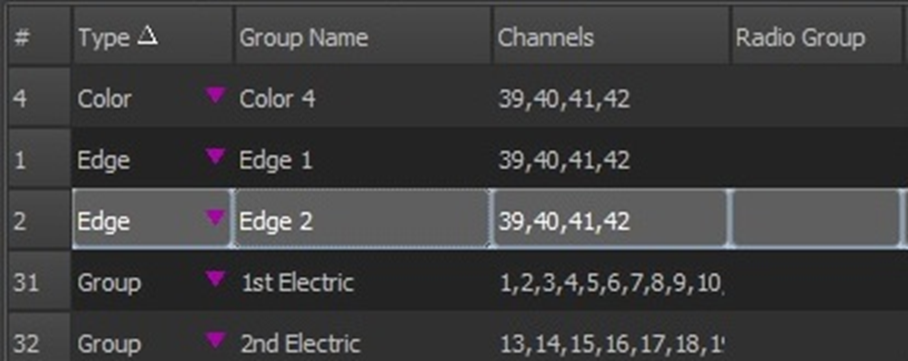
Number (#) &Type
The traditional type is labelled “Group” and can contain a snapshot of one or more fixtures and their attributes with or without an intensity parameter. The remaining types are called “Specific Palettes” and contain a snapshot of just the attributes in the named palette type. The standard types are “Intensity”, “Position”, “Color”, “Beam”, “Edge” and “Utility”. The attributes associated with each type are detailed in the “Edit Palette Type” option described later in this section. The entries for each type are numbered sequentially as they are created or recorded.
If a submaster is specified when recording a group, the Type is recorded as “Submasters” instead of “Group”. This allows the two types to be numbered separately without interference.
A special palette type called “Preset” that supports nesting of other palette types has been added. As an example, you could select a fixture, apply Color and Position palettes and record that as a Preset palette.
Group Name
The group name is a description field that provides easy identification of the group. When a new group is created or “Record Group” in the channel display is used, the group name can be supplied. When “Record Palette” is used, the name is generated automatically as “{Attribute Type} {n}”. The name can be edited by clicking in the field and entering the new name.
Channels
This field lists the channels (fixtures) included in a group or palette (as many as will fit in the width). The complete list can be seen in the details pane.
If a new group has been created, the channel list (and level) can be entered using the command line syntax (see Group Mode Operations for more details). Also, you can use the “Add/Del” tab of the details pane to enter the channels (fixtures) to be included.
Radio Group
This is a feature that allows collecting groups into exclusive sets. When the group value in a Radio Group is set via a submaster, apply shortcut or toggle shortcut, the values of the other groups in the set go to zero. To create an exclusive set, enter the same number in the “Radio Group” column for the groups you wish to assign to the set. To remove a group, clear its “Radio Group” cell.
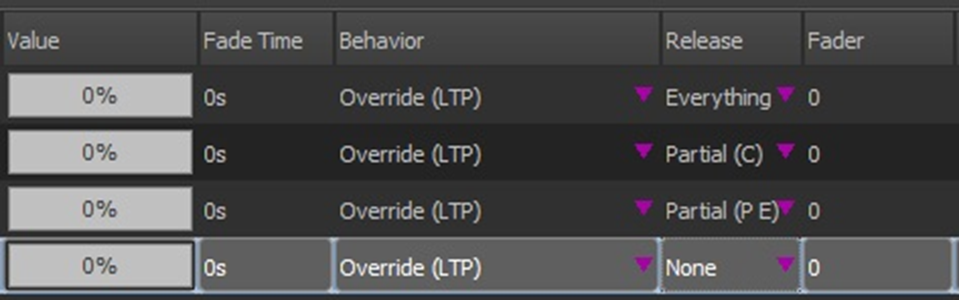
Value
This is the current output state of the group and is a percentage value between 0 and 100%. By default, the cells are drawn as graphical bars representing the value. You can adjust the value of the selected group using the mouse wheel (user option) or click on the graph which changes the cell to an edit control and type in the desired value.
The level displayed in the graph is known as the group value. In addition to setting this value directly, it can be controlled by assigning a submaster (fader) to the group. Whenever the submaster is operated, the resulting group value will be shown. The output levels of the attributes stored in the group are (conditionally) proportional to their maximum values. See the sections on Fader and Snap Attributes below for more information.
Fade Time
The fade time (in seconds) specifies how long the system will take to go from the current value to a new value. When a group is recorded, the default fade time is determined by the setting in the “Show Defaults” tab of “System Properties”. The default time can be modified by clicking in the cell and entering a new value. A split (Up/Down) time can be entered also.
A channel or attribute fade time will override any value set in this field.
Behavior
The behavior column refers to the interaction of the group with other controls that may be setting the levels of the fixtures in the group. This applies only when the group is being “operated” with or without a submaster. Generally, the behavior takes effect the first time a group’s value is raised above 0. Group control is released under various conditions as detailed below.
NEO Notes & Tips: When a group is applied in live or included in a cue, the behavior is always Override (LTP) regardless of the setting in this column.
The default behavior set when a group is recorded or created is controlled by two options in the “Show Defaults” tab of “System Properties”. If a group is recorded without a submaster, the default is determined by the “Group Behavior”. If a submaster is specified, the default is determined by the “Submaster Behavior”. See Show Defaults for more information.
The behavior of a group can be changed by clicking on the small arrow to the right of the field. The following options are available:
· Override (LTP) – Also known as “Latest Takes Precedence”. As soon as the group value goes above 0 or changes, the fixture outputs will be controlled (proportionally) by the group value (i.e. overridden). In turn a group value can be overridden by another control (for example, a channel level or cue). If the group value goes from some level to 0, the fixture outputs will be determined by the setting in the “Release” column described below.
· Build – The output levels of the group will be added to the current fixture outputs up to a maximum of 100%.
· Exclusive – Similar to Override, fixture outputs will be controlled by the group value as soon as it goes above 0. However, other controls are locked out and cannot affect the fixture output. In order to release control of the group, the option “Release all submaster control” must be selected from the “Release” pulldown menu on the Main Display.
· Highest Takes Precedence (HTP) – In this mode, the fixture outputs will be set by the control with the highest value. If the output level in the group is higher than that of a fixture’s current control (such as a cue) then the group level is applied. Normally you would not be able to override a fixture level controlled by an HTP group, but there is an option in “Show Defaults” that can be set. This option is “Override takes precedence over HTP”.
· Independent – Similar to Exclusive except group control is released when the group value reaches 0.
· Inhibit – The group outputs master the fixture outputs, preventing them from rising above the group outputs. In order to release control of the group, the option “Release all submaster control” must be selected from the “Release” pulldown menu on the Main Display.
· Hue LTP – This is a special type designed to be used with color mixing fixtures. As the group value changes from 0 to 100%, the output of the group will be the saturated hue value between 0 and 360°. This translates to a full color spectrum that can be set by the group.
· Subtract – Similar to Build, the output levels of the group will be subtracted from the current fixture outputs.
· Intensity HTP / Attributes LTP – Similar to Highest Takes Precedence (HTP) but non-intensity parameters will be controlled by group outputs on a “Latest Takes Precedence” basis rather than having to rise above current levels in order to take control.
Release
This option determines what attributes (if any) are released when the value asserted by the group is less than the value asserted by another control (such as a cue), i.e. HTP behavior. If an attribute (or “Everything”) is checked, the values asserted by the group will be released, returning them to their previous values. If none of the attributes (including “Everything”) are checked, the group values will override the previous control. In this case, the group values will remain in control until an LTP action occurs or the “Release all submaster control” option of the “Release” button on the main display is activated. “Everything” is the default setting for all recorded groups.
Fader (Submaster)
A submaster is a physical or virtual control for the group value. Virtual submasters can be displayed and operated in one or more separate windows and may take the form of graphical faders or a grid similar to the channel display. A submaster may be assigned to a group at the time it was recorded or added here by clicking on the cell and entering a value. If assigned when the group was recorded, the “Type” field is set to “Submasters” rather than “Group”.
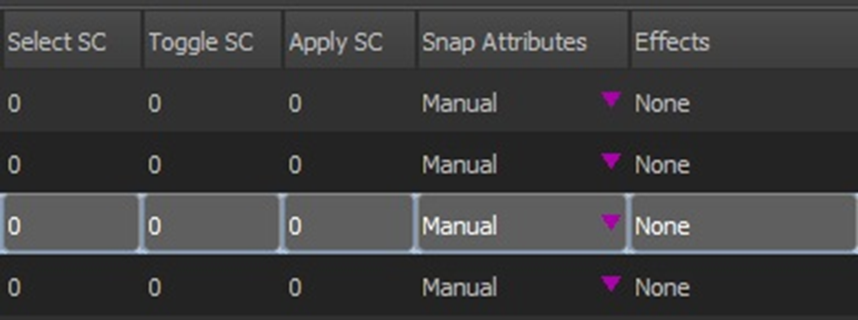
Select/Toggle/Apply Shortcuts
A shortcut is a physical or virtual button that when activated can perform an action. Three types of shortcuts can be assigned to a group.
A select shortcut, when activated, simply selects the fixtures in the group which are shown highlighted in the main display. Once selected, other operations can be performed on the selected fixtures.
An apply shortcut will set all attributes of the fixtures in the group to their maximum values as recorded.
Any values that are changed from their current levels as the result of applying the group will transition in the “Fade Time” set for the group (except those channels/attributes set with an override time and/or delay).
A toggle shortcut applies the group on the first activation and removes the group (sets the group value to 0) on the second activation. In the shortcuts window, a toggle shortcut displays an indicator for its state (red for off and green for applied).
Snap Attributes
This option controls the behavior of non-intensity attributes when the group is applied. The following choices are available:
· Manual – Attributes will change levels in proportion to the group value.
· Snap off zero – Attributes will snap to the value stored in the group as soon as the group value rises above 0.
· Snap at full – Attributes will snap to the value stored in the group when the group value reaches 100%.
Effects
This field lists the effects included in a group or palette (as many as will fit in the width). The complete list can be seen in the details pane. This is a read-only field. Effects are added to or deleted from a group in the “Group Details Pane”.
NEO Notes & Tips: Effects are controlled by the group value or submaster only. Applying a group from the channel display will not activate any effects associated with it.
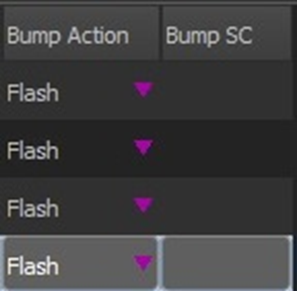
Bump Action & Bump SC
Bump buttons are associated with physical or virtual submasters. Each group can assign one of the following actions to a bump button:
· Disabled – No action.
· Flash – Default. Set group value to 100% while depressed, return to 0% when released.
· Solo – All atrtributes of the fixtures recorded in the group remain at their present levels while all other attributes are forced to 0.
· Flash + Solo – Combination of the two actions.
· Latch – First press sets group value to 100%, second press resets group value to 0.
· Latch + Solo – Combination of the two actions.
· Shortcut – When pressed, the bump button triggers the shortcut specified in the “Bump SC” column.
· Select – Turns the bump button into a select button. All fixtures stored in the group will be selected.
· Mark Att – Equivalent to “Latch” except only affects non-intensity attributes.
Special Groups
By default, several special groups are defined and listed in the Groups Editor. In addition, special groups called partitions may be added. Each group name is preceded by the tilde character (~).
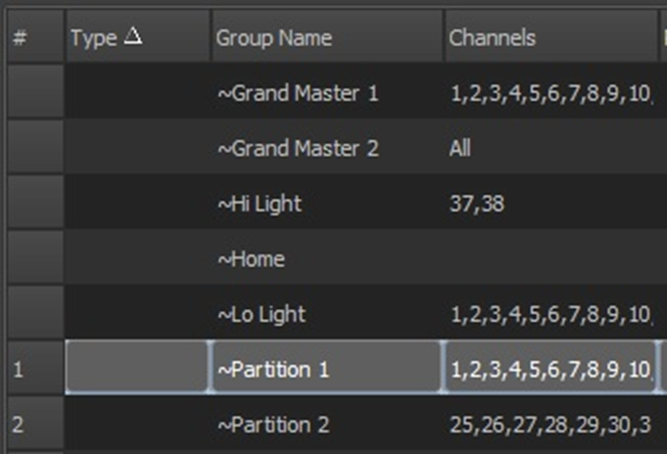
~Grand Master 1 & ~Grand Master 2 - A grand master (GM) is a control that scales the output (intensity values only) of the entire system. NEO has two grand master controls that each can be assigned to different blocks of channels. Two special groups named ~Grand Master 1 and ~Grand Master 2 are displayed in the grid and only the “Channels” field can be edited. By default, all channels are assigned to both.
~Hi Light –Fixtures can be set to a special position/value in order to make them easy to identify. Normally, Hi Light values are determined by the fixture profiles patched into a show. However, this special group can be set up to override the normal fixture library values. This and other special groups can be assigned a submaster and shortcuts to easily apply the group.
~Home – Similar to ~Hi Light, this group can be set up to override the default attribute values defined in the fixture library.
~Lo Light – Unlike the Hi Light values available from the fixture library, the Lo Light values must be set in this special group in order to use the “Lo Light” mode in the Main Display. This provides an additional way to identify a fixture in a live lighting rig by making it stand out from the others.
~Partition n – These special groups may be added and used to divide the total channel count into separate parts that can then be assigned for control by specific users. An example is a large venue that contains multiple performance spaces. Only the Channels field can be edited. Each partition will be assigned a number sequentially in the order created.
~Position DSC – This special group can be used to store the Pan & Tilt positions of all moving head fixtures aimed at “Down Stage Center”. In conjunction with the “Trim Height” setting stored in the Show Defaults section of System Properties, the system can then calculate relative positions for fixtures when applying palettes that don’t have all fixtures recorded.