Introduction
Quick Start
Creating a New Show
Patching Some Fixtures
Live Channel Control
Recording Groups, Palettes & Submasters
Recording & Updating Cues
Adding an Effect
Saving the Show
Running a Show
Front Panel
Displays
Top Menu Bar
Selection Keys & Options
Selection Tool
On & Out
Home
Fan
Hi Light
Park
Undo
Release
Recording Buttons & Options
Groups
Palettes
FX Library
Copy
Command Line
Master Fade Time & Page Controls
Windows
Options Menu
More Options
New Show
Open File
Save & Save File...
Connect to remote
Backup Now
Task Scheduler
User Security
Reports
Patch
Patch Window
Command Line Patching
Drag & Drop Patching
Patch Detail Pane
Options Menu
RDM
Edit Menu
Soft Keys
MUTE Output
Visible Columns
Search Bar
DMX Outputs Pane
Fixture List Pane
Patch Encoders
Matrix Editor
Controlling Fixtures
Color
Selecting Channels
Intensity
Attributes
Releasing Channels
Channel Commands
Additional Channel Commands
Parking
Groups & Palettes
Groups & Palettes Editor
Group Details
Group Details Pane
Channels Overview Tab
Channel Grid
Matrix
DMX
Timing & Delay
Add/Delete
Palettes
Effects
Groups & Palettes Editor
Editor Grid
Editor Options
Select Active Button
New & Delete Group
Filtering
Group Mode Commands
Palette Types
Recording & Updating Groups & Palettes - Command Line
Record Group
Record Palette
Palette Windows
Generic Palettes
Effects
FX Playbacks
FX Editor
FX Editor
Creating new effects
Simple lighting chase
Timeline effect
Profile effect
Matrix Effect
Paint Box Effect
Media Playback Effect
DMX Recorder
Deleting an Effect
Effect Options
Effect Library
Effect Editor Controls
Recording Chases
Submasters
Cues & Cue Lists
Cue List Editor
Cue List Details
Cue List Editor
Cue Lists
Cue List Grid
Options Menu
Cue Options
Cue List Execution
Recording & Updating Cues - Command Line
Recording Cues - UI
Update Cue - UI
Cue Timing
Follow and Link
Copying & Moving Cues
Deleting Cues
Cue Execution Commands
Playbacks
Shortcuts
Snapshots
Magic Sheets
Macros
Blind
System Properties
System (DMX)
System Settings
Show Defaults
Network Access
Appearance
System Properties
Basic Mode Settings
Registration
Visualizer
Remote Options
Media Settings
Special Shortcuts
NEO Console Debug
Keyboard Shortcuts
External Triggers
MIDI
MIDI Control
MIDI Learn
Note Triggers
Note Velocity
Control Change Events
Timecode (MTC) / Clock
MIDI Show Control
Debug Messages
External Triggers
Line in
Timecode A & B
mySQL
Vision.Net
Contacts
OSC
ChilliNet
iCAN
Typing into the Command Line
Command Syntax Conventions
Saving & Loading Show Files
Programming Commands
Communication with external systems
Timing Commands
Software Updates
NEO Tips & Tricks
- All Categories
- Cues & Cue Lists
- Recording Cues - UI
Recording Cues - UI

he “Record Cue” button is located along the top of the Main Display. The main button function (left-hand side of the button) will present a dialog to record a cue in the Live mode as shown below:
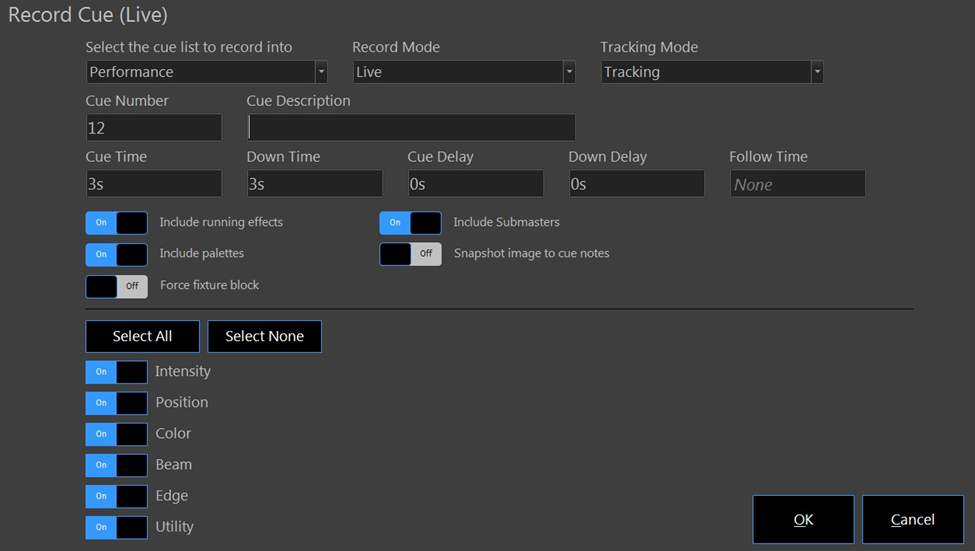
Select Cue List - The cue list currently loaded into the Master Playback will be shown. Use the pulldown arrow to select a different cue list if desired. The last cue list selected will become the default for subsequent cues.
Record Mode – The options are:
§ Live – Record all channels/fixtures whose intensity is above 0 and/or any channels having attributes that have changed from the previous cue. This is the default mode if the main Record Cue button is clicked.
§ Selected – Record only the channels currently selected in the Channel Display.
§ Active – Record all channels whose intensity is above 0 (hybrid tracking) or channels whose intensity has changed (full tracking).
§ Changed Only – Record only the channels that have changed from the previous cue. (Note: Useful only for hybrid tracking.
Tracking Mode – Refers to the mode when recording cues, not when cues are run.
§ Cue Only – Record changes to the specified cue only and don’t track the changes forward or backward to any other cues. This is the default for hybrid tracking.
§ Cue Only (Int)/Track (Atts) – Records changes to intensity to the cue only while propagating changes to attributes forward through the cue list until a new value or block is encountered.
§ Track – Record changes to the specified cue and track them forward to subsequent cues unless blocked. This is the default for full tracking.
§ Track Back – Record changes to the specified cue and track backwards to previous cues unless blocked.
§ Smart Block – This is a cue-level block that applies a block flag to all currently active fixtures.
§ Block – Apply a cue-level block flag to every fixture patched into the show.
Cue Number – The cue number will increment automatically to the next whole number available in the selected cue list. This field can be edited to change the number. Cues can be numbered to 3 decimal places. If a cue number is entered for an existing cue, a caution flag will be displayed. If you click OK, the cue will be overwritten with the current state of all fixtures and the numbering will advance from that point.
Cue Description – This is a text field where you can add a label to the cue. The label will appear along with the cue number in the cue list editor and any playbacks.
Cue Times – These fields will be populated with any defaults set in System Properties>Show Defaults. Any time can be adjusted as needed by clicking in the field and entering a new value.
Include Running Effects – The default state of this switch is determined by the option set System Properties>Show Defaults.
Include Palettes – Turn on this option to record the currently active palette references into the cue. By recording the reference into the cue, you can modify a single location to update multiple cues. For example, a position palette can be recorded into the cue so that if the position on stage changes, you only need to update the position palette and every cue that references that palette will use the new position information. The default state of this switch is determined by the option set in System Properties>Show Defaults. If this switch is off, active palette references will be replaced by the actual values in the cue.
Include Submasters – This option, when off, will ignore the value of attributes that are currently being controlled by a submaster. The default state of this switch is determined by the option set in System Properties>Show Defaults.
Force Fixture Block – In addition to cue-level blocks, individual fixtures may be blocked to prevent all attributes from being tracked forward. Setting this option On will apply the fixture block to any fixtures being recorded with changes to their attributes from the previous cue.
Snapshot Image to Cue Notes – If you have a video capture device set up under System Properties>Media Settings, setting this switch to On will cause a frame from the device to be captured and included as a note associated with the cue. See section “Cue Lists” for more information on cue notes.
Palette Types – You can select what palette types you want to record into the cue (reference or actual values depending on the state of the “Include Palettes” switch described above). What attributes get recorded in each palette type is determined by the “Edit Palette Type” option of the “Groups” window. By default, all types are turned on. A cue can be recorded with any combination of attributes.
Record Cue Options
The following options are available via the drop-down menu:

Record Active Fixtures to Cue – This option will present the same dialog as above, but with the Record Mode set to “Active”.
Record Selected Fixtures to Cue – Similar to above, but with Record Mode set to “Selected”.
Record Live Fixtures to Cue – Similar to above, but with Record Mode set to “Live”. This is the same as clicking the main Record Cue button.
Record/Remove selected fixtures to/from multiple cues – Use these options to add in to or remove from multiple cues. A dialog is displayed to allow selecting the cues to be actioned and in the case of adding fixtures refining what gets added by attribute type.
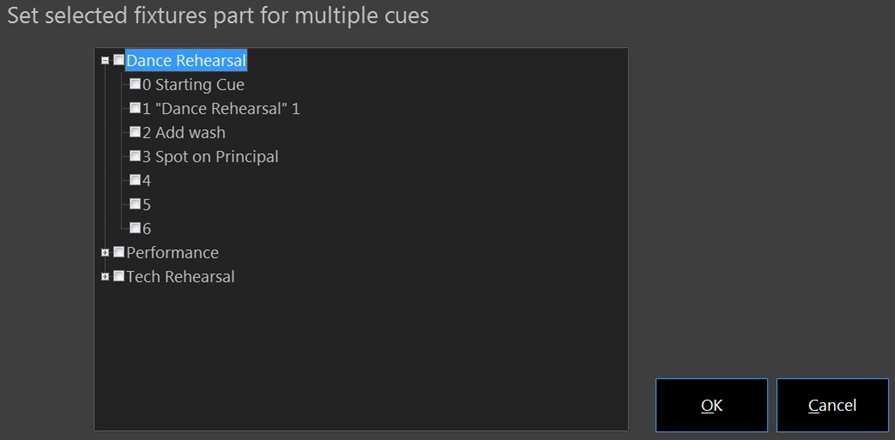
Set selected fixture part for multiple cues – If a fixture has been assigned a cue part in one cue, this option will allow you to propagate that status to other cues using the same fixture. The following is a sample dialog for this option: