Introduction
Quick Start
Creating a New Show
Patching Some Fixtures
Live Channel Control
Recording Groups, Palettes & Submasters
Recording & Updating Cues
Adding an Effect
Saving the Show
Running a Show
Front Panel
Displays
Top Menu Bar
Selection Keys & Options
Selection Tool
On & Out
Home
Fan
Hi Light
Park
Undo
Release
Recording Buttons & Options
Groups
Palettes
FX Library
Copy
Command Line
Master Fade Time & Page Controls
Windows
Options Menu
More Options
New Show
Open File
Save & Save File...
Connect to remote
Backup Now
Task Scheduler
User Security
Reports
Patch
Patch Window
Command Line Patching
Drag & Drop Patching
Patch Detail Pane
Options Menu
RDM
Edit Menu
Soft Keys
MUTE Output
Visible Columns
Search Bar
DMX Outputs Pane
Fixture List Pane
Patch Encoders
Matrix Editor
Controlling Fixtures
Color
Selecting Channels
Intensity
Attributes
Releasing Channels
Channel Commands
Additional Channel Commands
Parking
Groups & Palettes
Groups & Palettes Editor
Group Details
Group Details Pane
Channels Overview Tab
Channel Grid
Matrix
DMX
Timing & Delay
Add/Delete
Palettes
Effects
Groups & Palettes Editor
Editor Grid
Editor Options
Select Active Button
New & Delete Group
Filtering
Group Mode Commands
Palette Types
Recording & Updating Groups & Palettes - Command Line
Record Group
Record Palette
Palette Windows
Generic Palettes
Effects
FX Playbacks
FX Editor
FX Editor
Creating new effects
Simple lighting chase
Timeline effect
Profile effect
Matrix Effect
Paint Box Effect
Media Playback Effect
DMX Recorder
Deleting an Effect
Effect Options
Effect Library
Effect Editor Controls
Recording Chases
Submasters
Cues & Cue Lists
Cue List Editor
Cue List Details
Cue List Editor
Cue Lists
Cue List Grid
Options Menu
Cue Options
Cue List Execution
Recording & Updating Cues - Command Line
Recording Cues - UI
Update Cue - UI
Cue Timing
Follow and Link
Copying & Moving Cues
Deleting Cues
Cue Execution Commands
Playbacks
Shortcuts
Snapshots
Magic Sheets
Macros
Blind
System Properties
System (DMX)
System Settings
Show Defaults
Network Access
Appearance
System Properties
Basic Mode Settings
Registration
Visualizer
Remote Options
Media Settings
Special Shortcuts
NEO Console Debug
Keyboard Shortcuts
External Triggers
MIDI
MIDI Control
MIDI Learn
Note Triggers
Note Velocity
Control Change Events
Timecode (MTC) / Clock
MIDI Show Control
Debug Messages
External Triggers
Line in
Timecode A & B
mySQL
Vision.Net
Contacts
OSC
ChilliNet
iCAN
Typing into the Command Line
Command Syntax Conventions
Saving & Loading Show Files
Programming Commands
Communication with external systems
Timing Commands
Software Updates
NEO Tips & Tricks
- All Categories
- Patch
- Drag & Drop Patching
Drag & Drop Patching

This is an alternative method of patching using the mouse or other pointing device.
Patching Standard Dimmers
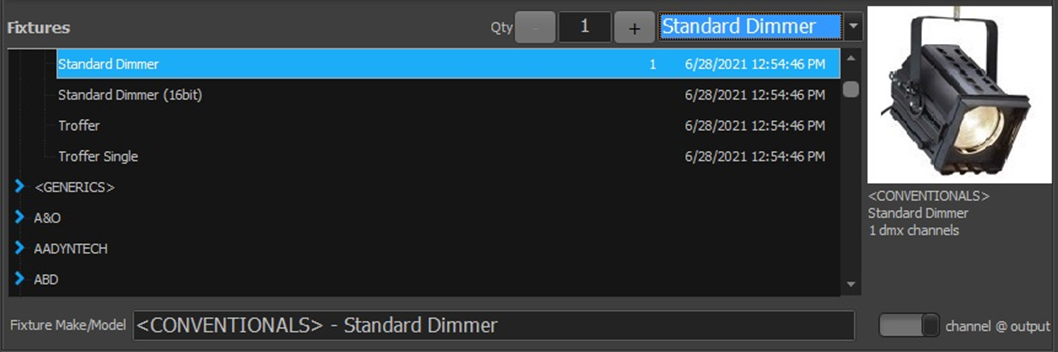
By default, the “Standard Dimmer” fixture is selected. Standard dimmers use only one address to control the circuit for a luminaire.
To associate the dimmer (address) with a channel using the Drag & Drop Method:
1. In the “DMX Outputs” pane, click on the desired address and hold the left mouse button down.
2. Drag the mouse over to the “Patch Address” column of the control (fixture #) to assign and release. When you release the mouse, the address will be patched to the control and appear in the “Patch Address” column. Also, the “Fixture Make/Model” column will be populated with “Standard Dimmer”. By default, assigning new DMX outputs to a control channel will replace any already assigned and those outputs will become “unpatched”. There’s an option labelled “Replace dimmers when drag and drop patching”, which when unchecked will allow multiple dimmers to be patched to a single channel or allow the assignment of a single address to multiple channels.
Multiple dimmers can be patched to a single channel also by clicking in the “Patch Address” field and entering a list of addresses separated by commas (,) and/or a range of addresses separated by a slash (/).
NEO Notes & Tips: Multiple dimmers connected to a channel will output the same value dependent on the channel value and the channel profile curve. This can be modified on a per dimmer basis. See “Edit Dimmer Profiles” in the Options Menu section below for more information.
Patching Intelligent Fixtures
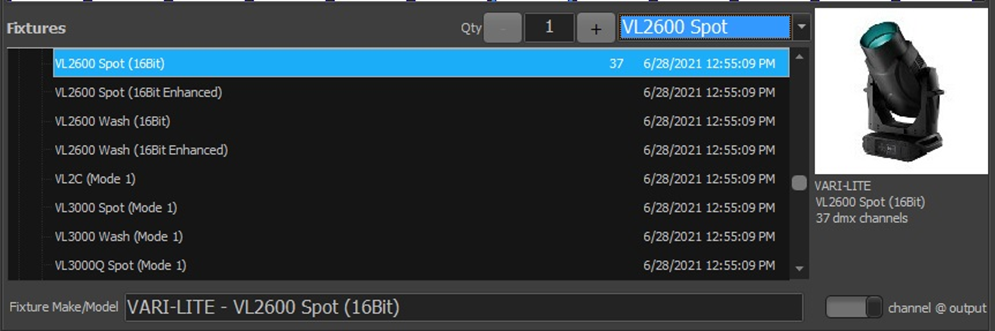
Intelligent fixtures use more than one DMX address to control various aspects or attributes of the model chosen. A channel can be patched to only one intelligent fixture at a time and can be identified by the name of the fixture in the “Fixture Make/Model” column.
To patch an intelligent fixture to a channel using the Drag & Drop Method:
3. Select the desired model from the tree view under the title “Fixtures”. To aid in locating a fixture brand and model, you can start typing in the “Fixture Make/Model” box and a popup with a list of matching entries will appear. The list becomes more refined as additional characters are entered. Once the desired model appears in the list, you may click on it to select it.
NEO Notes & Tips: All the fixtures are grouped under the brand name and can be accessed by clicking on the small arrow to the left of the brand name. The brand will then be expanded showing all the models available.
4. Click on the fixture model you want to patch, and you will see a picture of it on the right.
5. Move the mouse over the “DMX Outputs” pane of the window and click on the address where the fixture starts and, while holding the mouse button down, drag it over to the “Patch Address” column of the control (fixture #) to assign and release. When you release the mouse, the address range will be patched to the control and the starting address appear in the “Patch Address” column. Also, the “Fixture Make/Model” column will be populated with the relevant information.
NEO Notes & Tips: When intelligent fixtures are selected, the block of addresses it needs will be highlighted to show the number of addresses that the fixture uses.
You can patch multiple intelligent fixtures at one time (consecutively) by changing the quantity (Qty) value at the top of the “Fixtures” pane. If more than one fixture is patched, then additional fixtures will occupy the channels following the first one you drag the patch to.

This list will contain all the fixture types patched into the show to date and provides an easy way to select them if needed to add more of a particular fixture type to the patch.