Timeline effect

Provides the ability to build your effect by viewing its behavior over a timeline. The effect has a fixed length, and each fixture can be given a specific behavior over that time.
Enter a name to identify the effect and click “OK”. The details will appear in the right-hand pane of the window.
An effect segment has a start offset time, start state, length and end state. When an effect runs it will progress through the list of segments executing each one in turn. If for example the first segment has an offset of 10 seconds, the segment will execute 10 seconds after the effect itself has started.
When a segment is executed, its start lighting state will be set immediately. The fixture will then perform a fade for the length of the segment to its end lighting state. If a segment is for an intelligent fixture, then all the attributes (excluding dimmer) will be pre-fetched and set up for the start state at the end of the previous segment. If for example a moving light will start in a different position for the second segment, then it will be moved to this new position at the end of the previous segment. When the effect starts, intelligent fixtures will be set to the start state of the first segment.
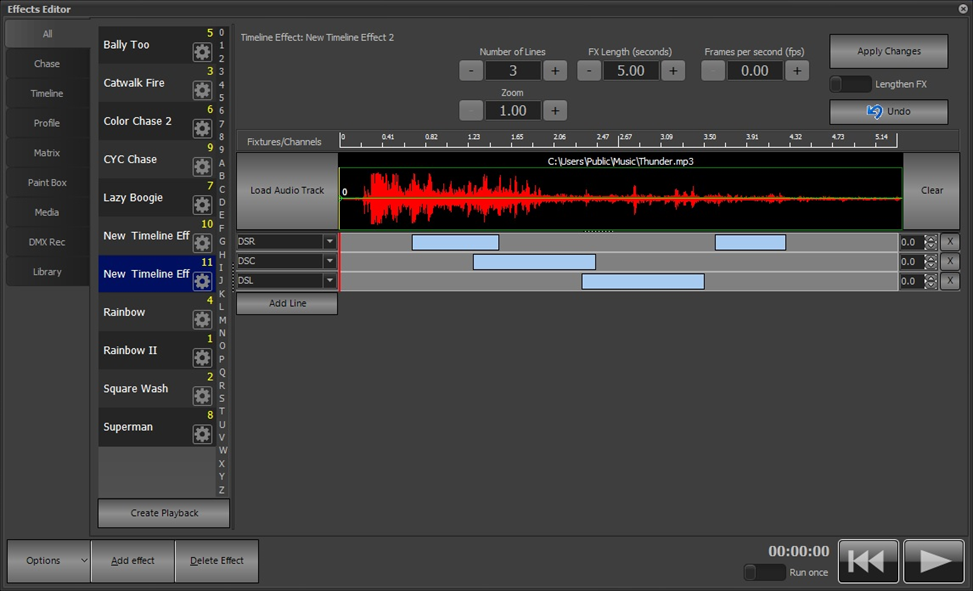
Timeline effects are viewed in NEO as a Fixture vs. Time graph. Along the top of the effect view, you will see a time scale from 0 to the length of the effect. On the left of the effect view is a list of the fixtures included in the timeline.
NEO Notes & Tips: Each segment of an effect cannot overlap any other segment for a given fixture.
Along the top of the view is the number of lines in the effect. This can be used to add or remove fixtures. If this number is increased, new lines will be added when the “Apply Changes” button is pressed. Each line can have as many fixtures in it as you want. Use the standard channel selection syntax to enter channels into the fields provided or choose a group from the pulldown list. If more than one fixture is added to a line, then all the fixtures in that line will do the same thing when the effect is run.
Also, along the top is the “FX Length” edit box that determines the default duration of the effect. Changing the effect length will change the time bar and increase or decrease how long an effect takes to run. To change the length of the effect, enter the desired time and click on the “Apply Changes” button.
There’s a switch that’s set to “Lengthen FX by default. Changes to the length of an effect will not change any of the existing segments. If you make the effect shorter, any segments that go beyond the new length will be truncated. Click on the switch which changes to “Rescale all elements” before applying changes to ensure that all segments are rescaled to any length changes.
To place markers along the timeline, use the “Frames per second“ edit box to enter a value. A new edit box labelled “Frame” will appear below. This can be used to move a marker to the desired frame along the timeline. These tools allow you to locate the beginning and end of a segment more precisely.
To the right of each segment line there is a small X for deleting the line from the effect. Clicking on the small X will remove this line (fixture) from the effect. A confirmation dialog will appear asking you to confirm that you want to delete the fixture. Click “OK” to confirm or “Cancel” to return to the effects editor.
Start Offset Field |
Use this field to specify a delay (in seconds) before starting this part of the effect. This allows you to stagger the execution of the effect across all the lines.
Zoom |
Use the zoom control to adjust how much of the effect is visible in the frame. A zoom setting of 1 will show the entire effect length in the editor window. As you increase the zoom level, less and less of the effect will become visible but each section of the effect will become larger for more detailed editing. A scroll bar along the bottom will allow you to move within the zoomed effect.
Load Audio Track |
A convenient use of the timeline effect is to accurately apply lighting changes to match music. Use the “Load Audio Track” button to render a waveform of the selected audio above the timeline. When the effect is played the audio track will play with it and an accurate position in the audio can be seen.
When the track is loaded, the “FX Length” will be adjusted to the length of the track. This may be changed if desired.
To clear the waveform, click on the “Clear” button on the right-hand side of the view.
The waveform is stored with the effect to make rendering it quicker however the actual audio track will remain as a file on the hard drive. If you remove the original audio file, the waveform can still be rendered but the audio will not play with the effect.
The height of the audio track display can be resized with the divider bar control between it and the segment display.
Creating and Editing Segments |
The graphical view of the effect allows you to easily see when the fixture is doing something. Each segment shows you at a glance that the fixture is changing state. The software will automatically set up intelligent fixtures between segments to their next state; hence, you need not be concerned with fixture attributes between segments. For example, often you may want the color of a fixture to be set before the light becomes visible. In the NEO effects engine, this will be done automatically for you if the next segment has this attribute set.
To create a new segment simply click inside the space provided to the right of the fixture, hold the mouse down and drag the segment to the desired length.
NEO Notes & Tips: By default, the newly created segment will have its start and end states set with the dimmer at full (100%) and all other properties set to zero.
The size of a segment can be adjusted by clicking and holding the mouse button down at either end of the bar and dragging it to the new length. When the mouse is moved over the end of the bar, its cursor will change to indicate the resize operation.
To move a segment to a different start position (offset), hold the mouse button down over the center of the bar and drag the bar to its new position.
To adjust the start and end state of the segment, click once on the bar to bring up the state editor panel.
The segment state editor panel will show all the generic attributes that can be set for the segment. Each one has a start state and an end state. To edit any of these values, click on the cell and enter the desired value.
At any time, you can double click on the heading of the row to load values from the fixture’s current state.
For the pan, tilt and color entries, you can double click to open a helper box that will allow you to select the values.
If the end state of a property is zero, changes made to the start state will automatically be copied to the end state to assist with creating new segments.
Alternatively, you can set a profile for each of the attributes. When a profile is selected, the start and end values will become disabled and the profile used to determine the output during the segment. The profile is a path that the values will apply during execution. To set a profile click on the appropriate column and select the profile from the list presented.
At the right of the segment state editor the pan and tilt paths are displayed for the selected segment. A moving light path applies to fixtures that have both pan and tilt control and allows you to create a continuous movement that will follow a defined curve.
NEO provides an advanced path editor that can be used to define the minimum number of points. A spline curve will automatically create the best-fit curve between each point. Two control points are automatically created to provide the ability to control the curve entering and leaving the first and last point. The path editor is described the “Cue List Editor”.
Options |
Clicking on the right mouse button while over a segment of the effect will bring up several advanced options to assist with creating effects.
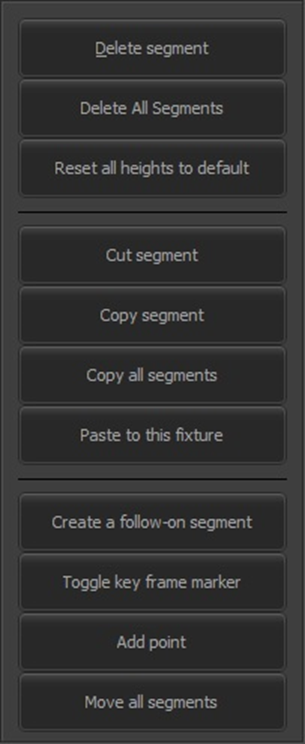
Delete Segment
Click on the “Delete Segment” option to remove the currently highlighted segment from the effect. A confirmation dialog will ask you to confirm this operation before the segment is deleted.
Delete All Segments
Click on the “Delete All Segments” option to remove the segments for this fixture. A confirmation dialog will ask you to confirm this operation before the segments are deleted.
Reset all heights to default
The heights of the lines making up the effect can be adjusted with the mouse. The option will return the heights to their default value.
Cut, Copy, Copy All, Paste Segments
The cut, copy, and paste functions operate exactly as they do in most applications you use within Windows. Cutting a segment will remove it from the effect and put on the clipboard for pasting somewhere else, while copying places a copy of the highlighted segment on the clipboard without removing it from the effect.
“Copy all segments” ignores the currently highlighted segment and places all of the segments associated with the fixture onto the clipboard.
To place a copied segment or segments onto a fixture, select the “Paste” option while the mouse is over the fixture you would like to paste to.
NEO Notes & Tips: When pasting, if a segment conflicts with segments that already exist for this fixture you are pasting to, nothing will happen.
After a paste operation, the segments will remain in the clipboard to allow you to paste segments to as many fixtures as desired.
This feature is useful after creating a moving light path to copy the newly created path to all the other fixtures in the effect. To do this, create a path for the first fixture and then select the copy all function. To create the path for all the remaining fixtures simply paste to each one in turn.
Create a follow-on segment
This option will copy the current segment and place it to the right. The segment can then be moved by clicking and dragging.
Toggle key frame marker
If you’ve set a frame count for the effect, use this option to show a marker for the selected frame which can be used as a reference point for setting and moving segments.
Add Point
If a profile has been set for a channel (for the dimmer for example), use this option to add a new point to the profile’s curve.
Move all segments
This option brings up a dialog box to enter a time value which will shift all the segments in the effect by the amount specified. Both positive and negative values may be specified.