Cue Options

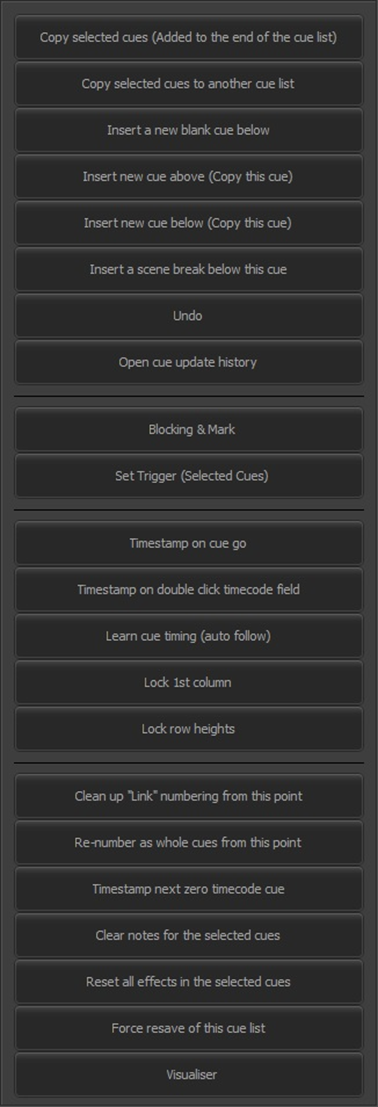
To assist with many tedious tasks the “Cue Options” drop down menu provides several convenient options related to creating and managing cues. This menu can be called up also by right-clicking anywhere inside the cue list grid.
Copy selected cues (Added to the end of the cue list) |
One or more cues in the current list can be selected and copied to the end of the list. To select multiple cues, click on the first cue’s row to highlight it, use the <SHIFT> or <CTRL> keys to select a range of cues in sequence or independently and choose this option. The added cue(s) will be numbered sequentially starting with the next whole number higher than the last cue in the list. All the properties of the selected cue(s) (channels, trigger, etc.) will be copied.
Copy selected cues to another cue list |
Similar to the previous option, the cues to be copied are first selected and then this option is chosen which displays the following dialog:
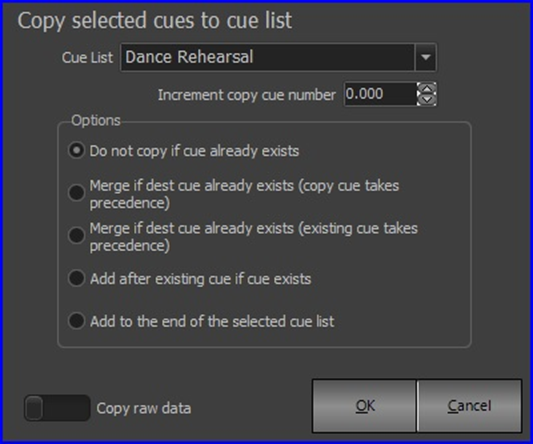
Use the pull down to select the target list for the copies.
Normally, the copied cues will retain the same cue numbers as the originals. However, you can adjust this by setting a value in the spin box, which will be added to the original cue numbers.
The Options section allows you to select the behavior of the copy operation:
§ Do not copy if cue already exits – This is based on cue number.
§ Merge… - If the “copy cue takes precedence” option is chosen, the channel data from the cue being copied will overwrite the existing data. If the “existing cue takes precedence” option is chosen, any channel already in the existing cue will not be overwritten.
§ Add after existing… - The increment number set above will be added to the copied cues.
§ Add to end… - The copied cues will be added to the end of the existing cues and numbered incrementally from the last cue in the list.
Copy raw data – If set, the copied cues will have only the state of the channels in the original. The other option is “Copy tracked state of first cue” and if set, the software will figure out what all the tracked values for every channel would be and set them accordingly.
Insert a new blank cue below |
This option will create a new cue directly below the currently selected cue. The cue number will be exactly halfway between the selected cue and the next. The properties of the cue will be set to the system defaults.
Insert a new cue above (Copy this cue) |
This option will create a new cue above the currently selected cue. The cue number will be halfway between the previous cue and the selected cue. All the properties (channels, trigger, etc.) will be copied from the selected cue to the new cue.
Insert a new cue below (Copy this cue) |
Same as above except the new cue will be created below the currently selected cue.
Insert a scene break below this cue |
A scene break is a description-only row that can be added to your cue list to help remember what is happening at this point in the cue list. Scene breaks are not cues and do not execute any lighting operation. It is a convenient way to label your cue list at key points and assist with cue list management.
After selecting this option, the software will prompt you for a label. Enter the name or description into the edit box provided and click “OK” to add the scene break. The background color of a scene break row can be set in the Appearance tab of System Properties. The default color is yellow.
Undo |
Use the undo function (alternatively you can use <CTRL>+z) to undo the last change made to the cue list. In the case of the cue list channel detail window the undo command will revert to the channel state when the cue was selected.
Open Cue update history |
The cue update history is a powerful system that remembers every state that has ever been recorded for the currently active cue. Whenever a cue is updated, an entry is added to the history. When this option is chosen, the following is displayed:
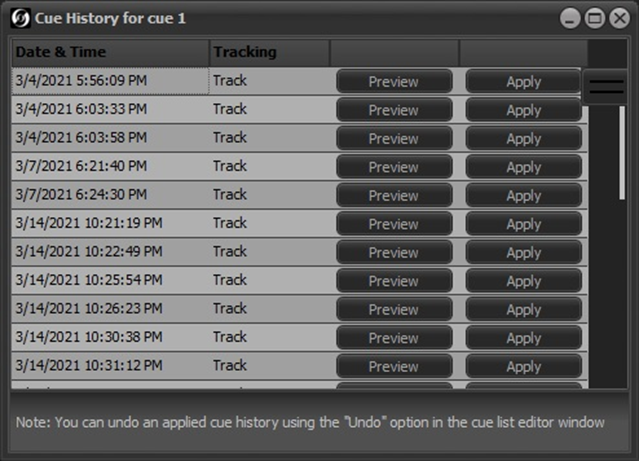
Use the “Preview” button to apply on stage what the cue looked like at the specified date and time. Click on the “Apply” button to set the state of the current cue to what it was at the selected date and time.
When a cue is reverted to a previous state the current state is also added to the history table so that no state is ever lost.
NEO Notes & Tips: If the cue update history function is turned off in System Settings, no entries will be displayed in the history window.
Block Cue & Set Mark |
A block prevents values from tracking through when recording or updating cues. Channels that are marked will cause the attributes that are changing in the current cue to occur before the cue is executed. Use these options to set or unset the block and mark flags for the selected cue.
Set Trigger (Selected Cues) |
To modify the trigger setting of multiple cues, first select the rows you want to change, then select the trigger from the sub menu.
Timestamp on cue go |
Turn this option on to learn the timecode for a show by running it in real time. Every time the “Go” button is pressed in the playback controls, the timecode will be recorded for the next cue. As each cue is executed, the trigger will change from “Manual” to “Timecode”.
NEO Notes & Tips: A timecode generator (external or internal) must be running for this option to work.
If this option is checked, a new option appears below it:
Only timestamp zero cues on GO – Only record a timecode if the field for the next cue is blank or zero (i.e. don’t overwrite any existing timecodes).
Timestamp on double click timecode field |
Choose this option if you would like to record a timestamp on selected cues without running them. With a timecode signal running, each time you double click on a Timecode cell, the current time will be added to the cue.
Learn Cue Timing (auto follow) |
With this option set, the auto follow time can be recorded by clicking the GO button while the triggering cue is running. This is useful when the auto follow time is based on a visual cue onstage.
Lock 1st column |
When set, the Cue Number column is locked in place and cannot be moved. If this option is checked, a new option appears below:
Copy cue on drag and drop – With the 1st column (the cue number) locked, a cue can be copied by clicking on its number and dragging it to the position in the list where you’d like to have a copy.
Lock row heights |
When this option is not set, the row heights in the grid can be adjusted by clicking and dragging between any two rows with the mouse. When this option is set, the current row height will become locked.
Clean-up “Link” numbering from this point |
If you have added entries in the “Link” column of the cue list and wish to reset the sequence in which cues are run, choose this option. The clean-up will happen from the currently selected cue down. To clean up the entire cue list, select the first cue before choosing this option.
Re-number as whole cues from this point |
If have a lot of decimal cues in the list from inserting cues or rearranging the order of the cues, you can use this option to quickly renumber. After this operation every cue will be a whole number with no decimal part to it.
The re-number will happen from the currently selected cue down. To renumber the entire cue list, select the first cue before choosing this option.
Timestamp next zero timecode cue |
When working with timecodes it is often useful or convenient to create your cue list without any timecode values loaded. Once you have created the cue list you must then go back and assign timecode values manually.
To aid with this operation, NEO provides the ability to timestamp cues with the last read timecode. Once you have created the cue list, you can then play back the timecode track and stamp each cue in real time. Because using the right click menu is not a quick enough operation when playing back media in real time, a shortcut (<CTRL> +t) is provided.
Clear notes for the selected cues |
Use this option to empty the cue notes field for the selected cues.
Reset all effects in the selected cues |
The reset effects option is used during playback of the cue list. If the cue contains effects, you can manually stop the effect execution without stopping the cue using this option.
Force resave of this cue list |
This is a diagnostic operation and is only needed if instructed by NEO support.
Visualizer preview options |
This sub menu can be used to view the state of a cue in the attached visualizer without having to run it live.
Preview this cue in visualizer – Choose this option and the currently selected cue will be shown in the visualizer output. The live output will be blocked until you release it.
Release visualizer preview – Use this release option to return control of the visualizer back to the live output.
Always preview the next cue in the visualizer – This option can be toggled on or off. If this option is on and a cue is run, the next cue will be shown in the visualizer and the live output will be blocked until this option is turned off or the release option is selected.