Table of Contents
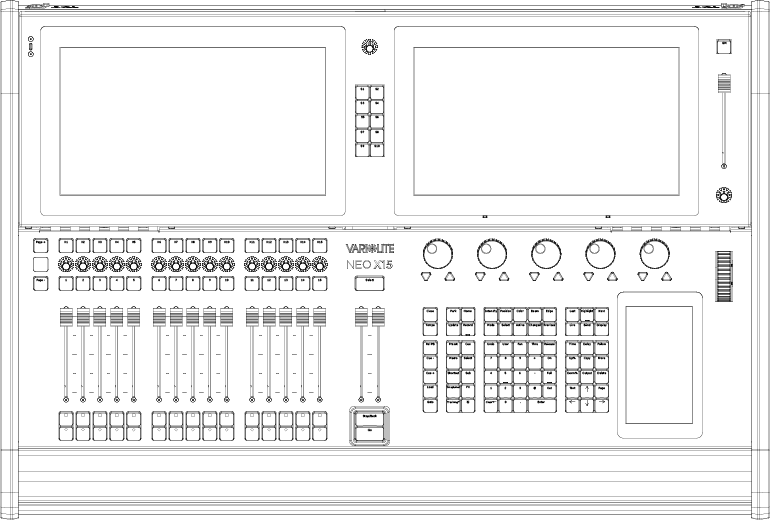
NEO X15 & X5 Console
NEO X15 Console (X5 only has 1 touchscreen and 5 playbacks)
PROGRAMMING BUTTONS
Command Tiles
76 keys that are grouped into like kind for faster programming.
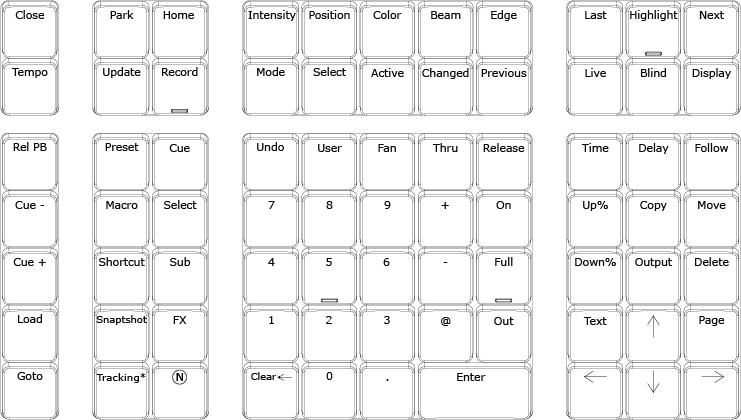
[CLOSE] Closes the focused open window.
[TEMPO] Allows the user to establish a tempo for manually stepped effects.
[PARK] Assigns the current fixture value to a locked level.
[UPDATE] Stores changes to the chosen item (Cue, Group, Sub, Palette). Updating a cue can include specifying a Cue List by name or number.
Examples:
- [UPDATE] [UPDATE] or [UPDATE] [ENTER] updates the current cue.
- [UPDATE] [CUE] {(CHANGED)} – repeated presses of [CUE] key alternate between {(CHANGED)} and {(SELECTED)}. [ENTER] update the current cue.
- [UPDATE] (PB#) [CUE] (#) updates a cue whose cue list is loaded into the specified playback.
- [UPDATE] [CUE] (cue list #) [CUE] (#) updates a cue in the cue list assigned by number.
[HOME] Applies the special group ~Home to the selected fixtures (if recorded). May be used with the Attribute Family keys to apply only the chosen family.
([RECORD] | [UPDATE]) [HOME] [ENTER] Records or updates the ~Home group with the selected channels.
Holding down [HOME] and pressing an encoder will "Home" a specific attribute.
[RECORD] Stores lighting states in the chosen item (Cue, Group, Sub, Effect, ([GENERIC PALETTE]/[INTENSITY]/[POSITION]/[COLOR]/[BEAM]/[EDGE])). If the chosen item already exists, a warning message will be displayed. The command syntax is similar to [UPDATE] above. For [RECORD] [CUE], [RECORD] [GROUP] and [RECORD] [SUB], repeated pressing of the item key will cycle through the recording modes available to that item.
Attribute Family Keys
The top row of keys is used to select an attribute family as labelled. When pressed, the rotary encoders load with the attributes of the chosen family. Repeated pressing of the chosen family key cycles the encoders through all available attributes. Using the [SHIFT] key cycles the encoders in reverse.
The attribute tabs in the Fixture Control display of the Sidebar will shift also. Likewise, the tabs of the Palettes pulldown (if visible) shifts.
Advanced Functionality: (Fixture List) [@] [POSITION] (#) [ENTER] will assign the fixtures selected to the position palette number. Works for users that have used [RECORD] [POSITION] (#) [ENTER] to record the position group. This functionality works with all attribute families.
Selection Keys
[MODE] Toggles Inclusive selection on/off
[SELECT] Opens the Selection Shortcut pulldown. This box will access programmed items in the current show file as well as provide access to Tools & Macros.
[ACTIVE] Captures all fixtures with a level above zero. May or may not include channels controlled by submasters depending on the setting of “Include Submasters” in System Properties>Show Defaults.
[CHANGED] Captures all fixtures with adjusted values. May or may not include channels controlled by submasters depending on the setting of “Include Submasters” in System Properties>Show Defaults.
[N] + [CHANGED] places all changed channels numerically on the Command Line.
[PREVIOUS] Captures the previously selected fixtures. Repeated pressing will alternate the selection.
[N] + [PREVIOUS] will select the channels that were last updated in a cue.
[LAST]/[NEXT] Advances to next or reverses to previous channel. Also acts as a tab key for navigating dialog boxes.
In general, it allows the ability to go to the Next or Last number in many places when using Command Line.
Examples:
- [UPDATE] [NEXT/LAST] will place the next/last cue number on the Command Line.
- [GOTO] [NEXT/LAST] will place the next/last cue number on the Command Line.
Advanced Functionality: [1] [+] [Next] will place 1 + 2 on the Command Line. [10] [+] [Last] will place 10 + 9 on the Command Line. Next/Last can be used multiple times as needed. Ex: [1] [+] [Next] [Next] will place 1 + 3 on the Command Line. Plus/Minus can be used multiple times during one command. Ex: [1] [+] [Next] [+] [Next] will place 1 + 2 + 3 on the Command Line.
[HIGHLIGHT] Sends selected fixtures to the "Highlight" value. The goal of Highlight is to allow the user to identify the highlighted fixtures on stage when many fixtures are in use. This usually will set the fixture to full intensity, clear all color parameters and all beam parameters. However, each fixture type's hi light values can be adjusted within the fixture library editor.
This allows for global highlight values for each fixture type. There is also the ability to set the highlight values per patched fixture within the show file.
Just set the fixture's state and [RECORD] [HIGHLIGHT] [ENTER].
[N] + [HIGHLIGHT] = “Lowlight”
Lo Light gives the user the ability to set a “Lowlight” state. Many programmers use a low light state that is similar in function to “Highlight” but instead of taking the fixture to a clear beam state to pull focus "to" the fixture, Lowlight would pull the focus "away" from the fixture. Essentially minimizing the contrast so that the fixture is not what stands out on stage. There is no default “Lowlight” state and nothing exists within the fixture library as it does with “Highlight”. The user would need to program a state for it, say a clear beam but with a deep blue. When the state is set, just [RECORD] [n] + [HIGHLIGHT] to store the Lowlight state for the selected fixtures. In order to apply, just select the fixture and press [N] + [HIGHLIGHT].
[LIVE] Live is the main viewport and shows all active output for fixtures and cues. When in Live mode, the display button's text is red. Pressing [LIVE] when in Live syncs the selected cue (blue background) with the active cue (gold border) and scrolls the active cue to the third cue in the visible list.
[BLIND] Switches the main display to blind mode which allows the cues in the cue list currently loaded in the master playback to be examined and modified without affecting the output. The Command Line Target displays “Blind” in red and shows the currently selected cue. The border around the Command Line Display/Edit Box will also be red. The cues can be navigated by using the [NEXT] and [LAST] keys.
[DISPLAY] Opens basic screen content options on the 7" touchscreen. From there, a different screen window can be opened.
[REL PB] Releases the current cue list in the master playback using the master fade time. Additional functions:
- [N] + [REL PB] - Will release all cue lists when multiple cue lists are running.
- (PB#) + [REL PB] - Will release the selected Playback.
[CUE -] Runs the cue after the current cue. [N] + [CUE -)] will go to the last cue in the current cue list.
[CUE +] Runs the cue before the current cue. [N] + [CUE +] will go to the first cue in the current cue list.
[LOAD] Preloads the specified cue as the next cue that runs on Go. [LOAD] (#) [ENTER]
[GOTO] Used to run a cue out of sequence using the default GOTO time as set in System Properties>Show Defaults>Cue Lists.
Examples:
- [GOTO] [4] [ENTER] – Run Cue 4 of the current cue list in the master playback.
- [GOTO] [ENTER] – Rerun the current cue.
- [GOTO] ([NEXT] | [LAST]) – Run the next or previous cue.
- [GOTO] [CUE] [3] [CUE] ‘/’ [6] [ENTER] – Run Cue 6 from Cuelist 3.
The default GOTO time can be overwritten by using the [TIME] key. Ex: [GOTO] [4] [TIME] [10] would run Cue 4 in 10 seconds.
[PRESET] A collection of channels/fixtures and their data. Groups can be just a collection of channel/fixtures at an
intensity level, or they can hold attribute information or both. Groups are very flexible and all groups (when stored in a cue) will reference back to the group data. This allows the user to change the data in the group without changing the cue itself. Specifies group selection. Ex: [PRESET] [1] [ON] or [RECORD] [PRESET] [1] [ENTER].
Advanced Functionality: When recording groups using Command Line pressing Group again will change the record mode. Recording a Group remembers the fixture selection order. This becomes important when groups are used to build effects. The effect will be applied in the order in which the fixtures were selected when recording the group.
Example: [RECORD] [PRESET] (#) [ENTER] will display {Record Group (Selected)} on the Command Line and will record only selected fixtures. Pressing [PRESET] again will cycle through all recording group options.
[RECORD] [PRESET] works without specifying a group number or group name. The next group number after the last group will be automatically selected.
[MACRO] Triggering device for stored keystroke entry. Can also run a macro file.
[SHORTCUT] A shortcut is a quick route to a particular setting or feature that is used frequently. A Shortcut can be triggered from the Shortcut buttons on the console, from the Shortcut page, a Cue, a Group or at startup.
[SNAPSHOT] A snapshot stores a specific console layout. This contains all screens and hardware status including fader page assignment. [RECORD/UPDATE] [SNAPSHOT] (#) [ENTER] will store a new or edit an existing snapshot.
[SNAPSHOT] (#) [ENTER] will apply a stored snapshot.
[TRACKING*] Toggles through the tracking options for recording and updating purposes. Ex: [RECORD] [CUE] (#)
[TRACKING*] [ENTER]. The Command Line will display the next available option after the first press (If in Tracking Mode then this will display "Cue Only", if in Cue Only mode, then this will display "Tracking". Additional presses will toggle through any additional options.
[CUE] A recorded state that can be played back in time.
[SELECT] Sets the selected fixture at the ON level and allows NEXT/LAST to run through all fixtures to perform a rig check.
[SUB] A fader that controls a group. In the Groups display, there is a Submaster column where a submaster can be assigned to a group. In addition, when recording groups there is a box where a submaster can be assigned.
Quick recording is available by typing [RECORD] [SUB] (#) [ENTER]. This will record a group of the same number and apply the submaster as a fader to that group. In addition, while holding down RECORD, press SUB and the Record Group dialogue box will appear. Also, type [RECORD] (Bump) where bump is the appropriate submaster's bump button. While this dialog box is open, notice that all available subs’ bump buttons are flashing. Pressing one will assign that sub to the Submaster number box for recording.
Advanced Functionality: Use the dialogue box solution to help the record sub process. With the desired fixtures selected and at the desired levels, type [RECORD] + [SUB]. The Record Group dialogue box will appear. All available subs and shortcuts will be flashing. Just press the desired sub button and that sub's number will populate the Submaster Number box. Once all other settings are correct, pressing [ENTER] will complete the record group action.
[FX] Places FX on the command line for command line operation. Allows the ability to assign effects to cues and run effects manually.
Advanced Functionality: When applying Command Line record, the FX button can be pressed again to change the recording mode to just record changed values.
Example: [RECORD] [FX] (#) [ENTER] will record the Live values to the next available FX's step number.
[RECORD] [FX] [FX] (#) [ENTER] will record only the Selected fixtures to the next available FX's step number.
[N] Used in conjunction with command/action keys for advanced functionality.
[N] + [PAGE UP/PAGE DOWN] = Playback page up/down.
[N] + [REL PB] = releases all active cue lists.
[N] + [CUE +/CUE -] = jumps to the first/last cue in the current cue list.
[N] + [HIGHLIGHT] = Lo Light.
[N] + [RELEASE] = global release. This releases everything. Channels, cues, subs, effects…everything.
[N] + [BACKSPACE] = removes all entered commands from the Command Line.
[N] + [THRU] = “Thru-On”. This selects only the active channels throughout the entered range.
[N] + [@] = Places “@ DMX” on the Command Line to enter a DMX value rather than a percentage value.
[N] + [ENTER] = places the last executed command on the Command Line without executing with the Enter key.
[N] + [PAGE] = pages back up the channel grid view.
[N] + [VIEW] = opens the View pulldown.
[N] + [TIME] = applies the current Stopwatch time to the current cue.
[N] + [FOLLOW] = Link
[N] + [EDIT] = Delete
[N] + [TAB] = Reverses the Tab key.
[N] + [LIVE] = Live Timing Display
[N] + [BLIND] = Blind Timing Display
[N] + [CUE LISTS] = Tracksheet
[N] + [HELP] = Lock console
[N] + [DIMMER] ‘SELECT DIMMER’ (#) [ENTER] = Select the channel by the dimmer patched to it.
[N] + [DIMMER] in Patch = will default the Fixture Make/Model back to “Standard Dimmer”.
[N] + [BLOCK] = UNBLOCK
[N] + [CHANGED] = Add the "changed" list of channels to the command line as text.
[N] + [ACTIVE] = Select all active channels excluding submasters
[N] + [PREVIOUS] = Select channels last updated to a cue
[N] + [Shortcut Keys] = shortcuts 11..20
[N] + [PB Select Keys] = Open the cue list/fx selection window to assign to the playback
[N] + [PARK] = UNPARK
[N] + [PALETTES] = Display generic palettes page
[N] + [GROUP] = PARTITION
[N] + [CUE] = CUELIST
[N] + [SUB] = PRESET
[N] + [FX] = MATRIX
[N] + [SHORTCUT] = SNAPSHOT
[N] + [LIVE] = Switch classic channel display to complex timing display
[UNDO] Allows undoing of the last level change: [UNDO] [ENTER], the last record: [UNDO] [RECORD] [ENTER], update, goto or delete action. Two presses release selected devices or undoes selected commands.
See Undo command at the top of the Main Display for more advanced Undo options.
Advanced Functionality
[USER] This is a shortcut button that has the advantage of being on the 10 key command tile for ease of access.
See SHORTCUT in this guide for more info.
[FAN] Launches the Fan tool. This is used for dynamic level changes. The encoders can be used to set parameters:
- [FAN] [INTENSITY] – Encoder 1: Attribute, 2: Mode, 3: Offset, 4: Spread
- [FAN] [POSITION] – Encoder 1: Pan Offset, 2: Pan Spread, 3: Tilt Offset, 4: Tilt Spread.
- [FAN] [COLOR] – Encoder 1: Color Spread, 2: Center Point, 3: Saturation, 4: Intensity
[THRU] Used when entering a range of numbers.
Advanced Functionality: [1] [N] + [THRU] {Thru-on} [10] [ENTER] will select all On fixtures "thru" the range of 1 to 10. The indicator for this is when pressing [N] + [THRU] the "Thru" on the Command Line will be replaced with "Thru-on".
- (Fixture List) [THRU] [ENTER]. This will select all fixtures up to a change in fixture type or an unpatched fixture. Ex: If 100 fixtures are patched, type [51] [THRU] [ENTER], 51 thru 100 will be selected as long as fixtures 51 thru 100 are the same fixture type. If 51 thru 60 are VL1100s, then the above syntax will select 51 thru 60.
- (Fixture List) [N] + [THRU] {Thru-on} [ENTER] will select all fixtures up to a change in fixture type or an unpatched fixture but only active fixture throughout the identified range.
[RELEASE] First press - will release all selected fixtures. Second press will release all adjusted fixtures. Any adjusted fixture can be identified by the red (changed) data.
Additional release key functions:
- [N] + [RELEASE] will release all control, including channel control, cues, subs, FX...everything, effectively taking the system to a state of black. Using [N] + [RELEASE] to release all control will ignore all Exclusive Submasters. This includes channel captures from the remote.
- [RELEASE] + [SUB] - will release all active subs.
- [RELEASE] + [FX] - will release all active effects.
- [RELEASE] + [GROUP] - will release all active groups.
- [RELEASE] + [GENERIC PALETTE] - will release all active generic palettes.
- [RELEASE] + [Position/Color/Beam/Edge] will release all Position/Color/Beam/Edge values.
Release key shows red if there is something to release in the system. If there are no channels to release the key will be white.
[CLEAR back arrow] Backspace functions as a typical PC backspace key would function. It removes the last command/keystroke entered on the Command Line.
[N] + [CLEAR back arrow] will clear out the entire Command Line entry.
[0 - 9] 10-Key Numerical Entry are used whenever a command needs a numerical entry, such as channel number, cue number, group number, etc.
[+]/[-] Plus / Minus keys allow for adding and subtracting fixtures from the Command Line fixture list. Ex: [1] [+] [3] [+] [5] [THRU] [10] [-] [7] [ENTER]. This will select 1, 3, 5, 6, 8, 9, and 10.
Advanced Functionality: Relative Values: Allows for using [+] and/or [-] in the Command Line for relative changes. Ex: [1] [@] [+] [10] [ENTER] This will add 10% to the selected fixtures.
[On] Takes intensity value to designated ON level for all selected channels. This level can be changed in: System Properties.
[FULL] Takes intensity value to 100% for all selected channels.
[Out] Takes intensity value to zero for all selected channels.
[@] Used to enter specific intensity value for all selected channels.
[ENTER] Completes an action or selection when entered from the Command Line.
[TIME] Allows the changes of times for cues and other elements. Example: [CUE] [1] [TIME] [5] [ENTER]. When setting Time in a Cue, pressing Time multiple times will allow for changing other time parameters.
1st press: Cue Time, 2nd press: Down Time, 3rd press: Position Time, 4th press: Color Time, 5th press: Beam Time, 6th press: Edge Time. From there it will cycle around again.
Example: [CUE] (#) [TIME] {/} (#) [TIME] {Pos Time} (#) [TIME] {Color Time} (#) [TIME] {Beam Time} (#)
[TIME] {Edge Time} (#) [ENTER]. That will assign a specific Up Time, Down Time, Position Time, Color Time, Beam Time and Edge Time.
Another use of the time key is to work with the attribute family keys to apply attribute family timing.
Example: [CUE] (#) [POSITION] [TIME] (#) [ENTER] will change the position time for the selected cue.
If channels are selected, pressing [TIME] now defaults to setting fixture timing. Also, (Fixture List) [TIME] (#) [ENTER] will provide timing for each fixture in the list.
[TIME] [SHIFT] + [TIME] is used to change the Master Fade Time of the console.
[DELAY] Any delay value will hold the cue for the specific amount of time prior to activating the cue.
Example: [CUE] [1] [DELAY] [2] [ENTER]
Pressing [DELAY] while in a cue will put CUE # DELAY on the Command Line making it easier to change the delay on the current cue.
Delay, like Time, can be applied to the Up, the Down, as well as Position, Color, Beam or Edge time. The syntax for TIME will work with the DELAY key.
[FOLLOW] Assigns a cue a follow command. A follow command on any cue will allow the next cue to run automatically after the follow time has expired. Example: [CUE] [1] [FOLLOW] [5] [ENTER]
There are three ways to use the Follow command:
- Follow In Time - [CUE] [1] [FOLLOW] [5] [ENTER] will force cue 2 to be triggered 5 seconds after cue 1 is triggered.
- Follow in Cue Time - [CUE] [1] [FOLLOW] [ENTER] will force cue 2 to be triggered at the completion of cue 1.
- Follow Hold - [CUE] [1] [FOLLOW] [+] [2] [ENTER] will force cue to be triggered 2 seconds after cue 1 completes.
If a cue has a follow command, [CUE] [1] [FOLLOW] [ENTER] removes the follow command.
If the console is sitting in the cue that needs a follow command, [CUE] (#) can be skipped and the first key pressed can be the Follow key.
[UP%/DOWN%] Takes selected channel up or down a predetermined amount (e.g. 10%). Also works in other instances, such as time windows, data fields, etc. Change this setting in System Properties > System Settings.
[N] + [UP%/DOWN%] applies up/down operation to active fixtures only. This is the same as using the [SHIFT] + [THRU] for the "Thru On" functionality.
[COPY] Allows data to be copied from selected channels. Example: [1] [@] [COPY] ‘COPY FROM’ [2] [ENTER].
Additional advanced functionality also available. An example is copying ranges of cues. Ex: [cue] (#/range) [copy] {copy from} [cue] (#/range) [enter].
[MOVE] Allows relocating items to a different number. Example: [CUE] 1 [MOVE] 2 [ENTER] will relocate cue 1 to cue 2.
[OUTPUT] Allows control of a DMX value rather than controlling by channel or fixture number. Example: [OUTPUT] [@] 100 [ENTER] will set DMX address 1 to full. A flag indicating OUTPUTS UNPATCHED indicates that an output has been assigned a level and that will override a level from it's channel or fixture. Pressing [OUTPUT][OUTPUT] will release and restore all outputs back to their patched channel/fixture control.
[DELETE] Allows the user to remove any item that has been created. Items include cues, groups, subs, palettes, effects, macros and shortcuts. For example, [DELETE][CUE] 1 [ENTER] will remove cue 1 from the active file.
[TEXT] Allows the ability to label an item. For example, [CUE] 1 [TEXT] Lights Up [ENTER] will assign the label "Lights Up" to cue 1.
[PAGE] Will "page" the channel display down to show additional fixtures. [SHIFT] + [PAGE] will "page" up.
[Arrow Keys] Moves the cursor in the desired direction within dialog boxes.
7" Touchscreen

Provides softkeys for programming. This is an extension of the hard keys.
S Keys
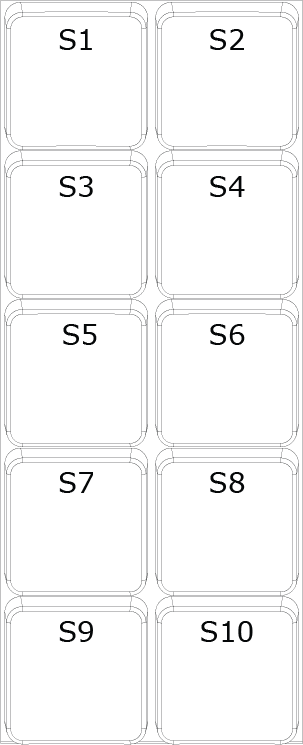
[S 1]... [S 10] By default, the S Keys store console layouts. On an X15 - the left hand keys store the layout on the left hand screen and the right hand keys store the layout for the right hand screen. S Keys can also be changed to different functionality in System Properties.
CONTROLS
Intelligent Lighting Encoders
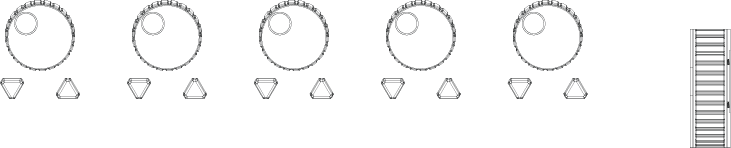
Rotary Encoders
NEO X5/15 consoles contain5 rotary encoders each with a left/right button. Will be Hi/Low values for the encoders attribute or will be Next/Last when assigned to a color/gobo/fx wheel..
Level Wheel
To the right of the encoders is a wheel that can be used to set levels and perform scrolling function depending on context. For intensity levels, the amount of change per step is settable in System Properties>System Settings (Wheel Sensitivity).
If no fixtures are selected and no other contextual control is being used (Example: [FAN]), then the encoders plus the level wheel will now provide the most logical control over the view. For example, in the live display, the level wheel will scroll the channel display, the first wheel will scroll the cue list in the sidebar, the second will zoom the channel display, the third will scroll the ML view and the 4th pan this view. The actions for other views are shown below. Holding down the [SHIFT] key while in any mode allows the encoders to reposition segments of the displays.
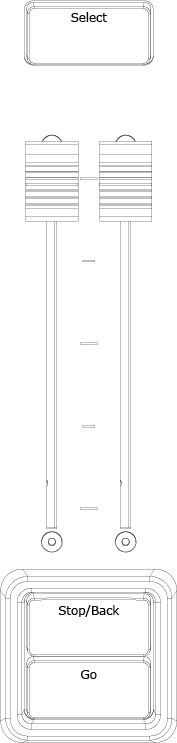
Multi-function Motorized Faders
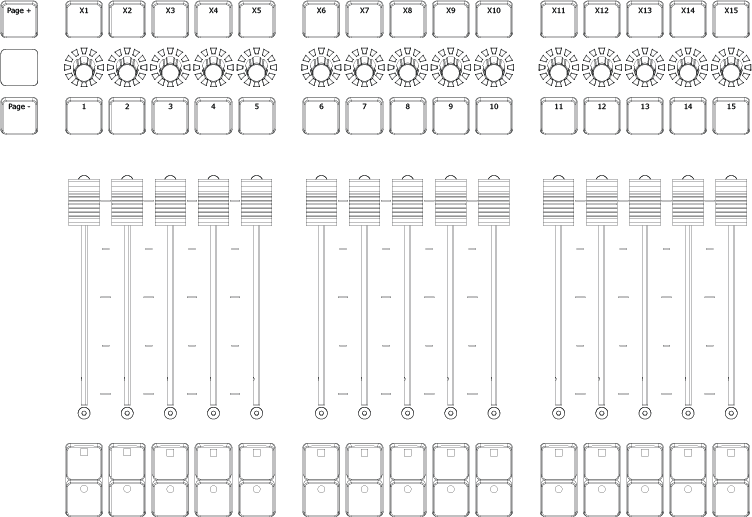
NEO X5/15 consoles has 5 or 15 (depending on model) of Multi-function Motorized faders. Faders can be submasters, cue list playbacks, FX playbacks or Speed Masters. Buttons default to Select, Stop/Back, Go for Playbacks and Flash for Submasters. Rotary knob can function as color select or speed adjustment depending on configuration.
Faders can be recorded on multiple pages. Use the [PAGE UP] & [PAGE DOWN] buttons to set the desired page.
The faders are motorized. When a fader is set from the Command Line, a group, a shortcut or and external controller, the slider will move to the current value being applied.
Master Playback
The NEO X5/15 Console has one Master Playback for the primary cue list’s operation. Fader setup is in System Properties.
Every show file has one cue list which starts out assigned to the Master Playback, thus the [SELECT] switch is always lit. If no other playbacks have been assigned, it will be white. If another playback is assigned and is selected, it will be blue.
The cue list assigned to the currently selected playback is also displayed in the Main Display’s sidebar.
A/B Faders
The two faders of the Master Playback can be assigned different functions in System Properties > System Settings (Basic):
- Disabled
- PB Master + Crossfader – Left fader scales intensity values of all channels under cue control from the master playback; Right fader acts as a manual control of cue execution, advances to next cue each time the fader reaches its end travel.
- PB Master + Disabled
- Cue List Split Crossfader – Left fader controls levels moving down in the next cue while right fader controls levels moving up. Both faders need to reach their end travel before the cue completes. Operating both faders together executes a standard crossfade. Holding down the [SHIFT] key while operating the faders will proceed backwards through the cue list.
[GO] & [STOP/BACK]
GO starts executing the current selected cue. If during the execution of a cue the STOP/BACK button is pressed, the execution will halt. Once halted, a second press of STOP/BACK will execute the previous cue or a GO will continue the execution of the current cue.
If no cue is running when STOP/BACK is pressed, the previous cue is executed.
Grand Master & Fade Time Controls
The console features one Grand Master slider with control buttons plus a Master Fade Time knob.

Grand Master
Grand Master with configuration options.
GM Button – The action performed by the button can be set in System Properties>System Settings. The options are:
- Disabled
- DBO Momentary – Go to Dead Blackout while GMn switch is pressed (Only affects intensity).
- DBO Latch – Go to Dead Blackout on first press & return to full output on second press.
- Stop Attributes – If any attributes are changing as the result of running a cue or an effect (position, for instance), the first press will freeze their values and the key legend will blink red. The second press will allow the progress to resume. This does not affect intensity parameters.
- Full Momentary – Set all outputs to zero while GMn switch is pressed.
- Full Latch – Set all outputs to zero on first press & return to full output on second press.
Master Fade Time Knob
Controls the rate for channel and shortcut recall. Does not affect timed cues and effects.
Command Line functionality: [TIME] [N] + [TIME] will place TIME MASTER on the Command Line. Enter the desired time in seconds and press [ENTER}.