Profile effect

This effect type is based on a time vs. level path that is assigned to a list of fixtures and specific attributes or properties. Create this type of effect to assign a time vs. profile path to specific attributes of fixtures. When the effect runs, the selected attribute will apply the values over a set time. Profile effects are a very powerful way to create complex effects with minimal effort. Once you are used to creating this type of effect you will find it the most common effect system you will use.
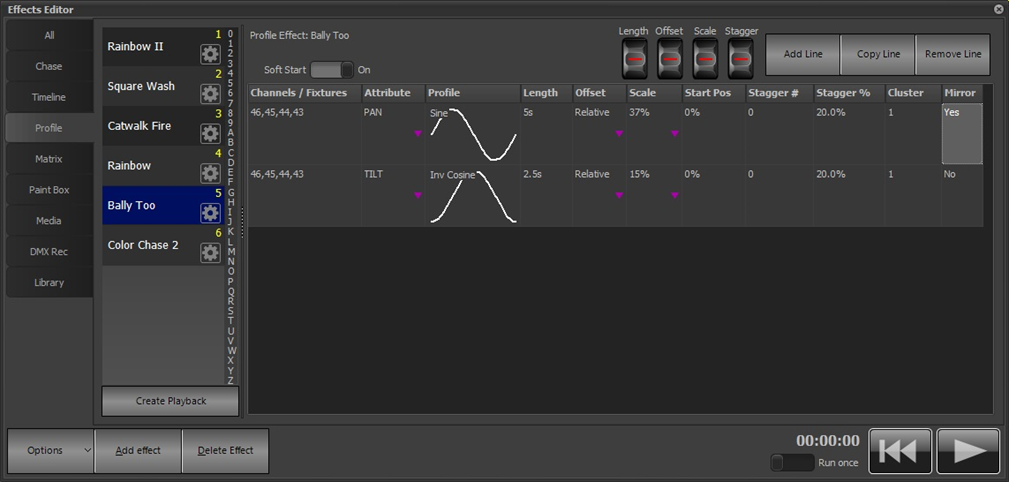
In the above example a profile effect has been created to operate on a set of fixtures. There are two elements in this effect, the first is a “Sine” wave working on the pan property and the second is an “Inverse Cosine” wave on tilt.
For each attribute you want to apply a profile path to, you need to create a separate line in the items table. In the above example, 2 entries are required to create a circle with the fixtures. The first entry controls the pan property and the second the tilt. If the desired effect was a ballyhoo, we might only require one entry applying a profile to the tilt property.
To add an entry in the items table simply click on the “Add Line” or “Copy Line” button. This will create a new line with either blank values or the same values as the previous line. To delete an entry, click on the “Remove Line” button.
Channels / Fixtures |
This is a simple list of fixtures that the profile and attribute will operate on. You can use the same channel syntax as the command interface to enter the channel list. By default, channels will remain in the order they were typed. Right clicking on the channel cell will display a popup menu of operations that may be performed on the channel list such as Sort (in ascending order), Reverse, Randomize, and Center Out. The order that the channels are listed in is important for the stagger and cluster operations.
In addition, the popup menu provides options to Add, Replace or Remove channels from the list. When one of these options is selected, a list of any selection shortcuts that have been set in the show file is displayed as an aid to performing the chosen operation.
Attribute |
This parameter specifies the attribute of each of the fixtures to which values will be applied. Use the drop-down menu to select from a generic list the attribute you want to use. The generic attribute can be used on any mix of fixtures. If the fixture does not support the selected generic attribute, then any applied values will be ignored.
Profile |
The profile is the key to this type of effect as it defines exactly what the selected attribute of the fixtures will do. As the effect plays, the output value (DMX value) is derived from a point in the profile path. A “sine” wave, for example, will output the DMX values 127 at time 0, 255 (full) at ¼ of the way through the effect and 0 at ¾ of the way through the effect. The value at each point in the path is affected by some of the other parameters such as Offset, Scale & Start Position. The selected profile is shown graphically in each line of the effect.
To change the profile, click on the profile column of the line you want to change. A drop-down box will appear listing all the profiles that exist in the system.
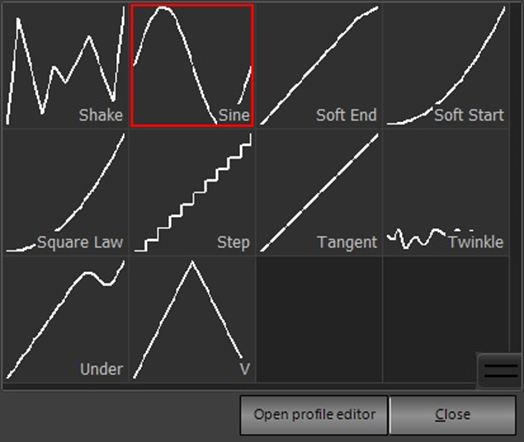
The profile chooser will display four profiles across to maximize the number that can be seen. The profile currently assigned to the line will be highlighted with a red border. Use the scroll handle on the right-hand side to find other profiles not visible on the page.
To select a profile, click the appropriate image and the profile picker will close automatically. The selected profile will be shown in the line you are working on. To close the profile picker without changing your selection, click on the Close button in the bottom right of the window.
To modify a profile, click on the “Open profile editor” button at the bottom of this window. This will open a new window to that will allow you to modify or create profiles. See “Edit Profiles” for more information.
Length |
The length specifies how long the chosen attribute will take to traverse the chosen profile. The length of the effect is the length of the longest item. If the length of an item is less than the longest path, then the speed that the path will play is made proportionally faster.
Offset |
Offset determines where the DMX output values will start from when the effect is run. The way in which an offset may be applied can be selected from the drop-down menu. The choices are:
Absolute Value: enter a DMX value from 0 to 255. When the effect is run, the channels will be set to this value initially and the profile value will be added to it (not to exceed 100% or DMX 255).
Relative (build), the default: When the effect is run, the profile value will be added to the initial channel value (not to exceed 100% or DMX 255).
HTP (Highest Takes Precedence): When the effect is run, the channel value will be the higher of its initial value or the profile value.
Subtractive: When the effect is run, the profile value will be subtracted from the channel value (not less than 0).
If you add the effect into a cue, then NEO will set up the fixture based on the data in the cue and then apply the effect. With this you can have 2 adjacent cues both using the same effect but running completely differently.
NEO Notes & Tips: If you are running this effect on Pan & Tilt, then a couple of special conditions apply. First, the current position of the light becomes the center of the path. If (for example) you are doing a circle, then the offset is automatically set up for you to make the current position the center. Secondly, when this type of effect is running, you can also use the pan and tilt controls in the channel view to move the position of the effect.
Scale |
The scale is a percentage that will be applied to the profile value. A scale of 50% causes the resulting values from the path to be halved. The combination of offset and scale can be used to restrict the output to a smaller range.
A drop-down menu gives a choice of Absolute Percentage to be entered in the cell or Relative to Live which uses the initial value of each channel as the scale to be applied.
Start Position |
The start position is used to specify the point in the path that will be used when the effect begins.
Stagger & Cluster |
The Stagger and Cluster options provide a powerful way to make an effect more interesting. The stagger value either specifies how many fixtures the effect will be staggered across or the percentage across the path each fixture will be at relative to its neighbors. A cluster value groups together the specified number of fixtures which will be treated as a single entity.
With a Cluster value of 1, a Stagger # of 4 means that each group of 4 fixtures in the Channels/Fixtures list will be equally spread across the path so that each fixture starts in a different position. In the example profile effect shown above, fixtures 1, 5 and 9 would start together at the 0 position of the profile; fixtures 2, 6 and 10 would start at the 25% position, etc.
If Cluster is set to 2 (keeping Stagger # at 4), fixtures 1 &2 and 9 &10 would start together at the 0 position of the profile; fixtures 3 & 4 and 11 & 12 would start at the 25% position, etc.
A stagger percentage (Stagger %) of 10% means that each fixture or cluster of fixtures will be 10% further along the path than the fixture before it. If the total length of the path is 10 seconds, then when the effect is at 0 seconds the 2nd fixture or cluster will be at 1 second, the 3rd fixture or cluster will be at 2 seconds etc.
This results in the fixtures all working slightly different. Making a number of moving lights all perform a simple circle can look good, but then to add variety you can use the stagger and cluster features to make each fixture start at a different point in the circle.
Mirror |
If set to Yes for a line, divides the channel list in half and applies the opposite value of the chosen attribute to each half. For example, if the attribute is PAN, one fixture would be set to the + value and the other to the – value as the initial starting points.
Soft Start |
The “Soft Start” option for each profile effect determines if the effect starts abruptly or slowly. When an effect is set to start slowly (soft), then it will ramp up the scale from 0 to whatever value is set over one complete cycle of the effect. If this option is turned off, the effect will immediately start at the scale factor set.