Introduction
Quick Start
Creating a New Show
Patching Some Fixtures
Live Channel Control
Recording Groups, Palettes & Submasters
Recording & Updating Cues
Adding an Effect
Saving the Show
Running a Show
Front Panel
Displays
Top Menu Bar
Selection Keys & Options
Selection Tool
On & Out
Home
Fan
Hi Light
Park
Undo
Release
Recording Buttons & Options
Groups
Palettes
FX Library
Copy
Command Line
Master Fade Time & Page Controls
Windows
Options Menu
More Options
New Show
Open File
Save & Save File...
Connect to remote
Backup Now
Task Scheduler
User Security
Reports
Patch
Patch Window
Command Line Patching
Drag & Drop Patching
Patch Detail Pane
Options Menu
RDM
Edit Menu
Soft Keys
MUTE Output
Visible Columns
Search Bar
DMX Outputs Pane
Fixture List Pane
Patch Encoders
Matrix Editor
Controlling Fixtures
Color
Selecting Channels
Intensity
Attributes
Releasing Channels
Channel Commands
Additional Channel Commands
Parking
Groups & Palettes
Groups & Palettes Editor
Group Details
Group Details Pane
Channels Overview Tab
Channel Grid
Matrix
DMX
Timing & Delay
Add/Delete
Palettes
Effects
Groups & Palettes Editor
Editor Grid
Editor Options
Select Active Button
New & Delete Group
Filtering
Group Mode Commands
Palette Types
Recording & Updating Groups & Palettes - Command Line
Record Group
Record Palette
Palette Windows
Generic Palettes
Effects
FX Playbacks
FX Editor
FX Editor
Creating new effects
Simple lighting chase
Timeline effect
Profile effect
Matrix Effect
Paint Box Effect
Media Playback Effect
DMX Recorder
Deleting an Effect
Effect Options
Effect Library
Effect Editor Controls
Recording Chases
Submasters
Cues & Cue Lists
Cue List Editor
Cue List Details
Cue List Editor
Cue Lists
Cue List Grid
Options Menu
Cue Options
Cue List Execution
Recording & Updating Cues - Command Line
Recording Cues - UI
Update Cue - UI
Cue Timing
Follow and Link
Copying & Moving Cues
Deleting Cues
Cue Execution Commands
Playbacks
Shortcuts
Snapshots
Magic Sheets
Macros
Blind
System Properties
System (DMX)
System Settings
Show Defaults
Network Access
Appearance
System Properties
Basic Mode Settings
Registration
Visualizer
Remote Options
Media Settings
Special Shortcuts
NEO Console Debug
Keyboard Shortcuts
External Triggers
MIDI
MIDI Control
MIDI Learn
Note Triggers
Note Velocity
Control Change Events
Timecode (MTC) / Clock
MIDI Show Control
Debug Messages
External Triggers
Line in
Timecode A & B
mySQL
Vision.Net
Contacts
OSC
ChilliNet
iCAN
Typing into the Command Line
Command Syntax Conventions
Saving & Loading Show Files
Programming Commands
Communication with external systems
Timing Commands
Software Updates
NEO Tips & Tricks
- All Categories
- NEO Tips & Tricks
- Understanding Tracking
Understanding Tracking
Understanding Tracking in a theatrical lighting environment is like Wordle. The rules are simple to understand, but in practice, it gets more complicated. So, let’s start with the rules.
In tracking, a channel’s level will only change when it has an instruction to do so. Seems simple enough right? In fact, it’s so simple that it’s exactly the way the lighting works in every home across the world.
Take this scenario…
You come home after working all day and it’s dark outside with no one home. You open the front door and turn on the lights in the living room. (That’s cue 1) Once you drop your bag you realize that you’re thirsty and want something to drink. So, you walk into the kitchen and turn on the kitchen lights. (That’s cue 2). What happened to the living room light? It’s still on. That’s because when you ran cue 2 – kitchen light on – you did not provide an instruction to the living room light to turn off therefore, it stayed where it was…on from cue 1. If the living room lights turned off, you would think your house is haunted.
Some of you might even say (at this point) that tracking IS simple to understand. The problem is that you are not just dealing with a few lights but dozens and perhaps hundreds of lights in a theatrical environment. Many of them can have dozens of parameters to track if they are a multi-celled LED fixture or automated luminaires. Also, the light is not just about being on or off. It can have an intensity level from 0 to 100 and each of its parameters could have up to 256 different instruction points AND you can have hundreds of cues in a typical commercial theatrical production.
Now it’s starting to become much harder to manage. This is where the structure, software, tools, knowledge, and setup to help with this come into play. Here are a few things to understand (and we’ll discuss this from the point of the Neo family of consoles).
Tracking is a default option. If you want to function in tracking natively, then have it set as the console’s default. If not, then go into System Properties > Show Defaults and change the “Default Tracking Record Mode”. (If you don’t know what mode you are in, look at the top of the side bar cue list. The yellow text will identify if you are in Tracking Mode, Cue Only Mode, or any of the others. (We’ll talk about all the options in the next tips and tricks installment.)
Tracking can be changed on a per cue basis. Let’s say you like working in tracking but for this one cue record or update, you want this action to be cue only. After you press RECORD or UPDATE, you can use the TRACKING OPTIONS button to toggle through all the different tracking options. That tracking option will work for that one action and the default (visible in yellow text at the top of the side bar cue list) will remain the same.
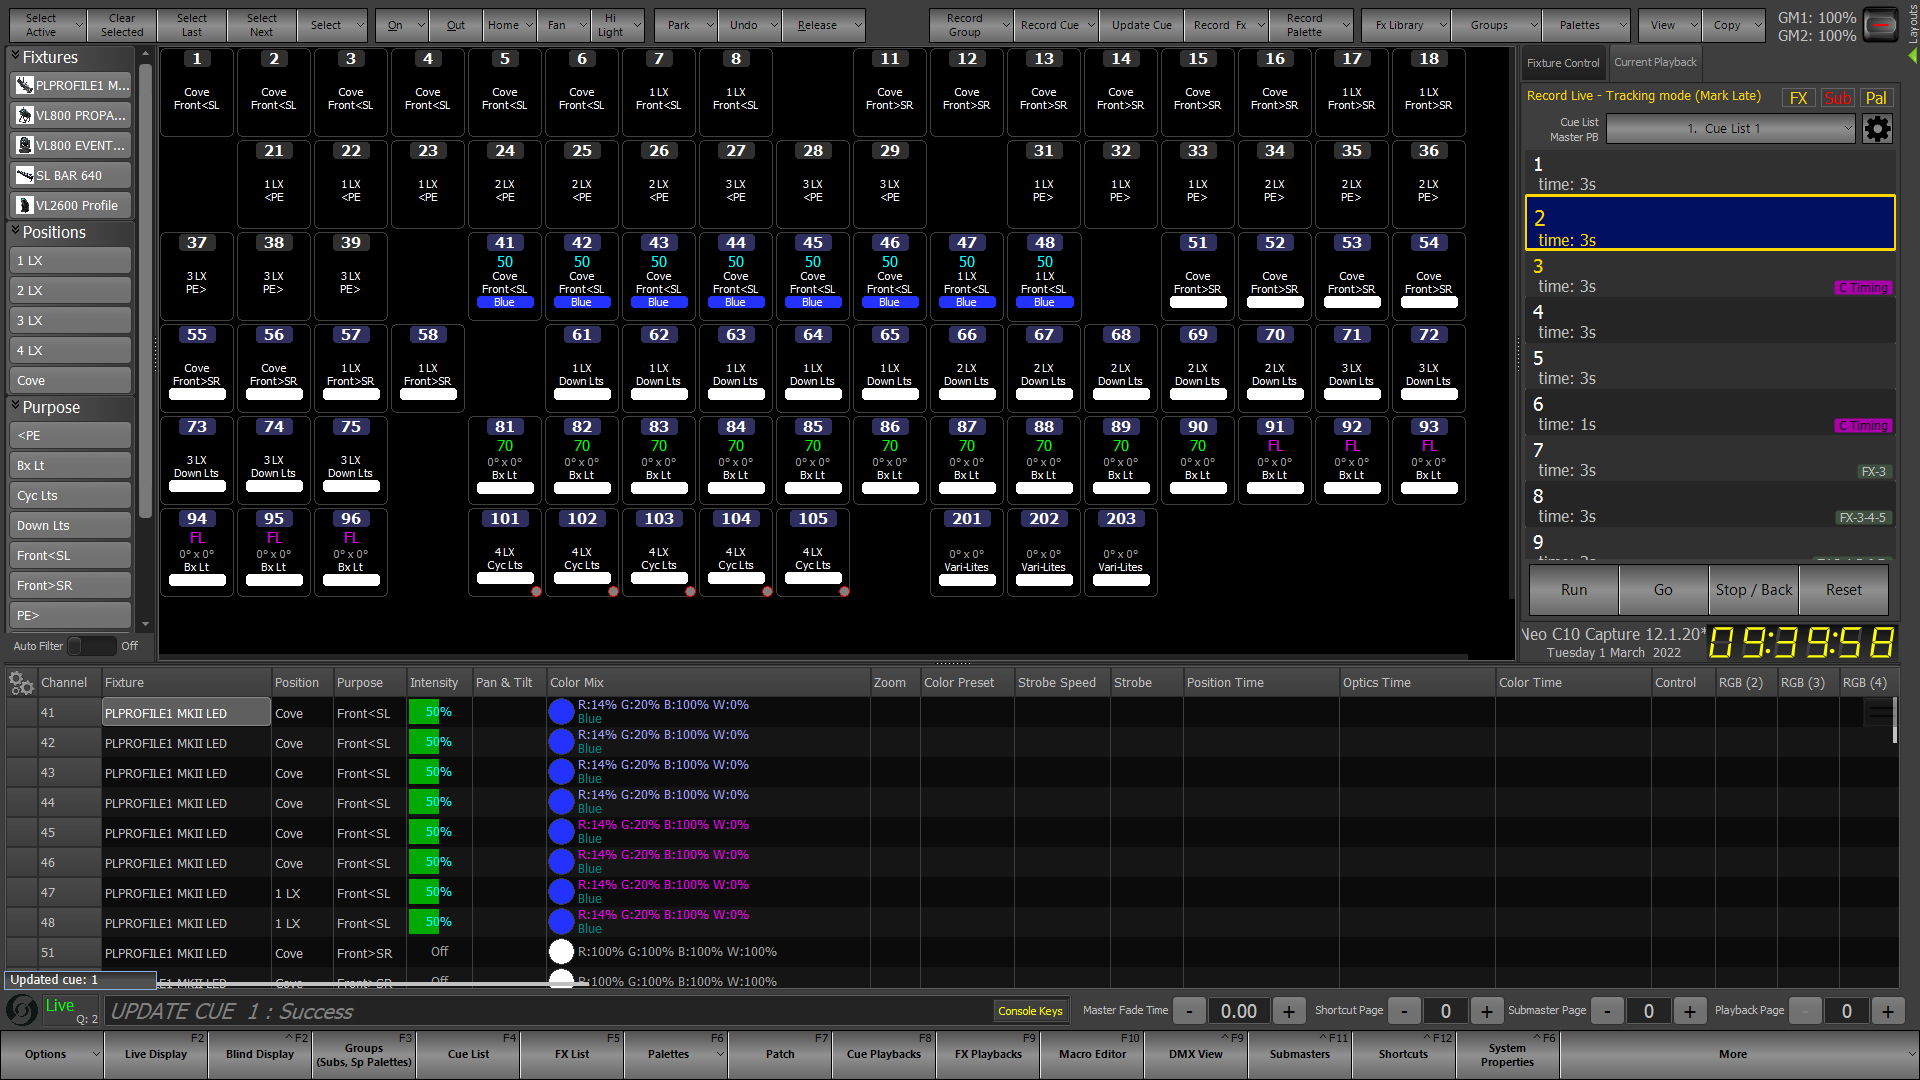
Channel level colors are very important to help the user understand the data in the cue. (See examples in the image below)
- Light blue indicates a channel’s level that is higher than in the previous cue. Because blue is up like the sky. (Channels 41 thru 46)
- Green indicates a channel’s level that is lower than in a previous cue. Because green is down like the grass. (Channels 81 thru 90)
- Medium Blue is on attributes and indicates an attribute has an instruction to move. It’s medium blue because it doesn’t matter if parameter is higher or lower, it only matters if it has an instruction to move. (Channels 41 thru 44’s colors)
- Magenta indicates a channel’s level that does not have an instruction and has therefore tracked into the current cue. It’s also the tracking color for parameters. (Channels 91 thru 95’s intensity and 45 thru 48’s colors)
- Grey is for parameters that are in their default position and have not yet been given an instruction within the cue list. (Channel 51’s parameters)
There are 3 kinds of people in the world…
- People that understand tracking.
- People that don’t understand tracking.
- And people that THINK they understand tracking.
Many people fall into the 3rd category. They may understand the definition of tracking but don’t understand how to manage it. For this, the Block Cue is the Tracking designer/programmer’s best friend. On Neo, there is a BLOCK key, or you can assign it from softkeys.

A Block cue will assign a hard level to all patched fixtures and their parameters. That hard level will stop any tracking values from earlier in the cue list from going “into or through” the blocked cue.
- White is a hard level and indicates a channel’s level has an instruction that doesn’t go up or down.
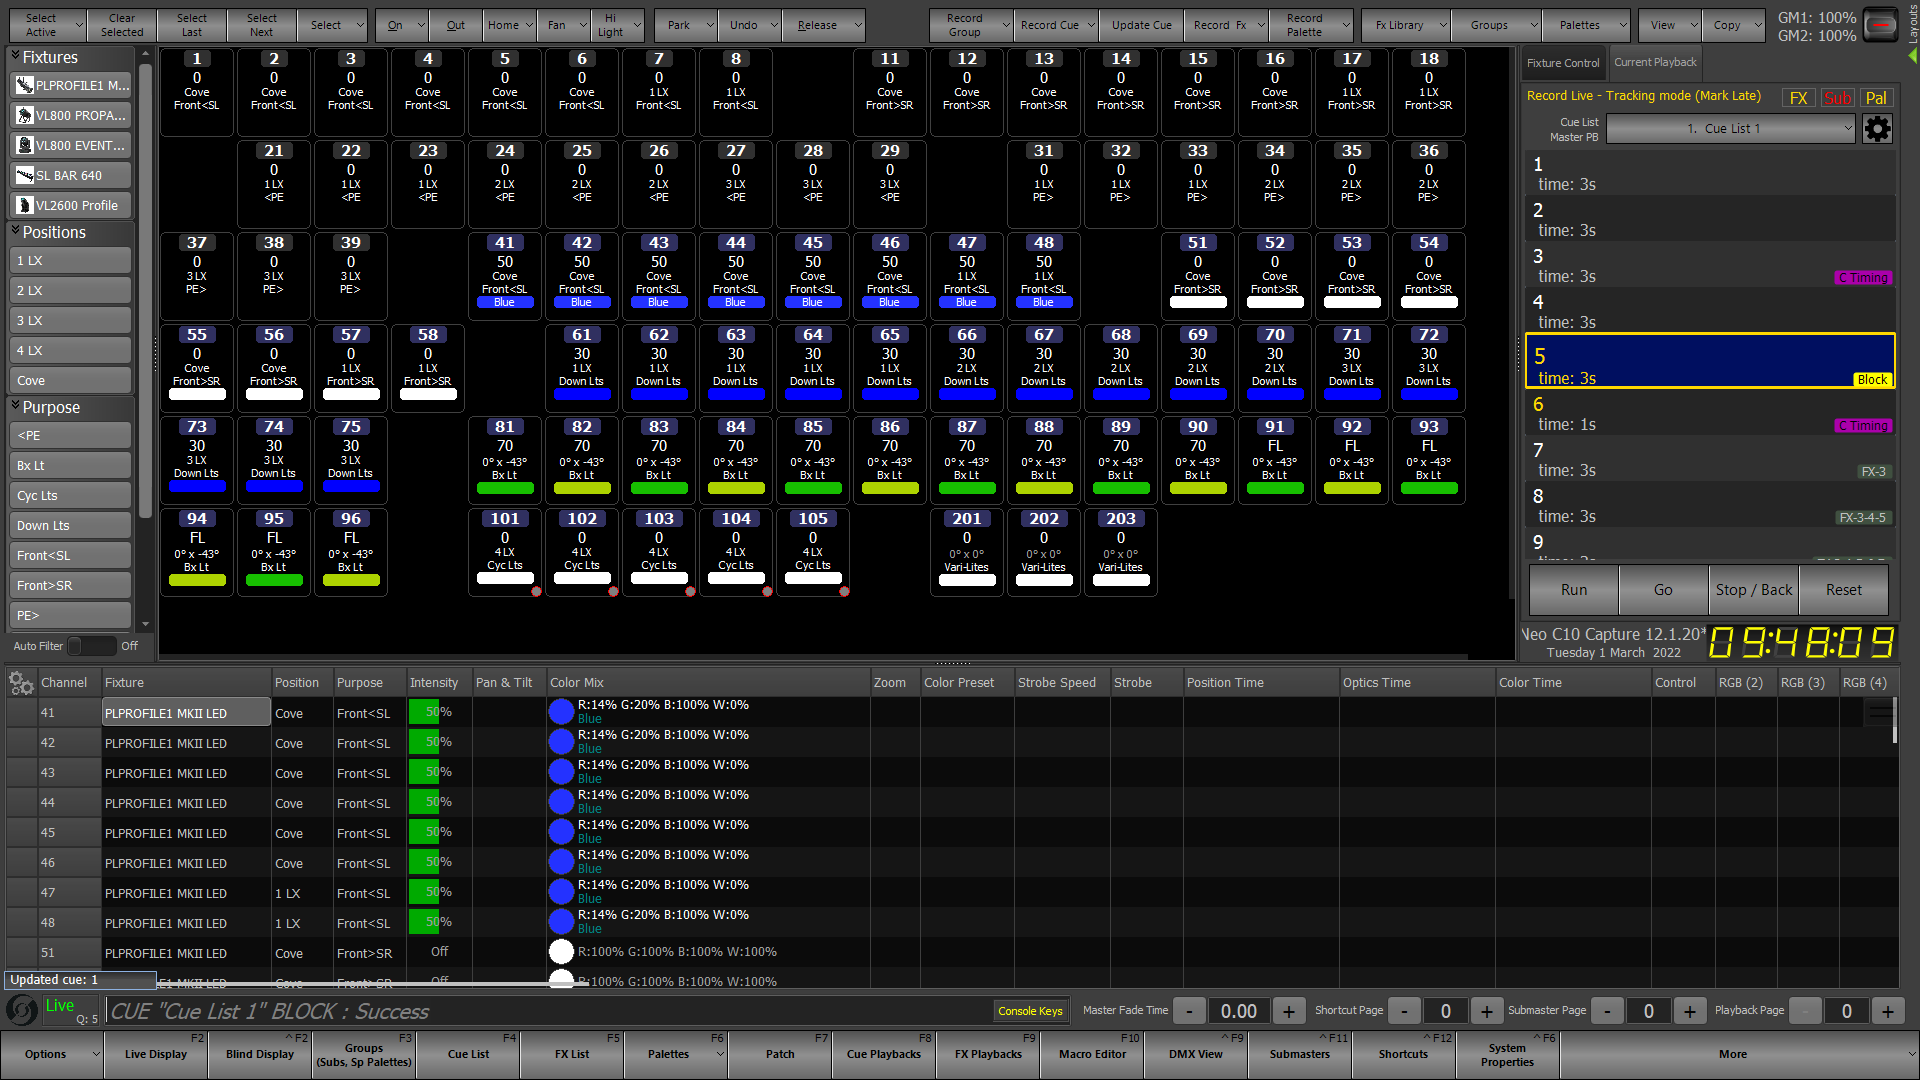
Strategically, if you work in tracking, it is strongly recommended that you block all end of scene, end of act cues and any other cues that constitutes a change of lighting idea. These might be cues that fade to black or not. Most people will block all fade to black cues or cues that have no output onstage. You want tracking to work for you – usually through internal scene cues – and not against you – into and through changes of scenes or acts.
Now that we better understand the definition of tracking, how to identify tracking and non-tracking information, let’s discuss where would you would use it. If you are making a change at the beginning of a scene, and you want that change to “track” through all cues in that scene, then make sure the end of scene cue is blocked and feel free to Update to Track. This can make editing when in tech much simpler. If you have any questions about which method to use, you might want to use Cue Only until you get a better handle on Tracking. Remember…it’s a tool and up to the user to know when to use that tool and when not to use it.
This is by no means the full story or tracking and its tools. However, this covers the introduction to tracking and how you can turn yourself into a designer/programmer that can proudly announce to the theatrical lighting world…yes…I understand tracking and use it all the time.
Happy Programming.