Introduction
Quick Start
Creating a New Show
Patching Some Fixtures
Live Channel Control
Recording Groups, Palettes & Submasters
Recording & Updating Cues
Adding an Effect
Saving the Show
Running a Show
Front Panel
Displays
Top Menu Bar
Selection Keys & Options
Selection Tool
On & Out
Home
Fan
Hi Light
Park
Undo
Release
Recording Buttons & Options
Groups
Palettes
FX Library
Copy
Command Line
Master Fade Time & Page Controls
Windows
Options Menu
More Options
New Show
Open File
Save & Save File...
Connect to remote
Backup Now
Task Scheduler
User Security
Reports
Patch
Patch Window
Command Line Patching
Drag & Drop Patching
Patch Detail Pane
Options Menu
RDM
Edit Menu
Soft Keys
MUTE Output
Visible Columns
Search Bar
DMX Outputs Pane
Fixture List Pane
Patch Encoders
Matrix Editor
Controlling Fixtures
Color
Selecting Channels
Intensity
Attributes
Releasing Channels
Channel Commands
Additional Channel Commands
Parking
Groups & Palettes
Groups & Palettes Editor
Group Details
Group Details Pane
Channels Overview Tab
Channel Grid
Matrix
DMX
Timing & Delay
Add/Delete
Palettes
Effects
Groups & Palettes Editor
Editor Grid
Editor Options
Select Active Button
New & Delete Group
Filtering
Group Mode Commands
Palette Types
Recording & Updating Groups & Palettes - Command Line
Record Group
Record Palette
Palette Windows
Generic Palettes
Effects
FX Playbacks
FX Editor
FX Editor
Creating new effects
Simple lighting chase
Timeline effect
Profile effect
Matrix Effect
Paint Box Effect
Media Playback Effect
DMX Recorder
Deleting an Effect
Effect Options
Effect Library
Effect Editor Controls
Recording Chases
Submasters
Cues & Cue Lists
Cue List Editor
Cue List Details
Cue List Editor
Cue Lists
Cue List Grid
Options Menu
Cue Options
Cue List Execution
Recording & Updating Cues - Command Line
Recording Cues - UI
Update Cue - UI
Cue Timing
Follow and Link
Copying & Moving Cues
Deleting Cues
Cue Execution Commands
Playbacks
Shortcuts
Snapshots
Magic Sheets
Macros
Blind
System Properties
System (DMX)
System Settings
Show Defaults
Network Access
Appearance
System Properties
Basic Mode Settings
Registration
Visualizer
Remote Options
Media Settings
Special Shortcuts
NEO Console Debug
Keyboard Shortcuts
External Triggers
MIDI
MIDI Control
MIDI Learn
Note Triggers
Note Velocity
Control Change Events
Timecode (MTC) / Clock
MIDI Show Control
Debug Messages
External Triggers
Line in
Timecode A & B
mySQL
Vision.Net
Contacts
OSC
ChilliNet
iCAN
Typing into the Command Line
Command Syntax Conventions
Saving & Loading Show Files
Programming Commands
Communication with external systems
Timing Commands
Software Updates
NEO Tips & Tricks
- All Categories
- Shortcuts
- Shortcuts Window
- Shortcut Options
Shortcut Options

To change the global display options for the shortcut window, click on the drop-down menu on the right of the mode button.
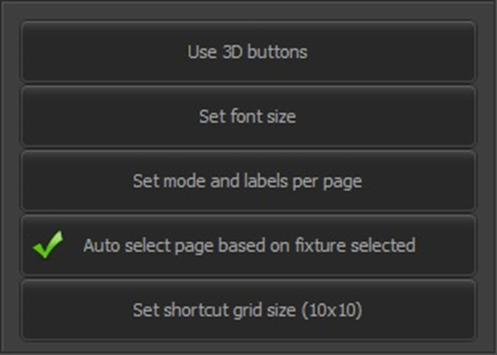
Use 3D buttons – (Default on) Use this option to change how each button is drawn. When this option is on, the buttons will have a 3D style gradient.
Set font size – Use this option to change the overall size of the text in each of the shortcuts.
Set mode and labels per page – When this option is turned on, the 4Up and normal mode can be set for each page. The labels will also be remembered for each page separately.
Auto Select page based on fixture selected – With this option turned on, the shortcut page will change if a palette page is set up for the fixture. This works on the name of the shortcut page. If a single fixture type is selected, then NEO will search through the page labels to try and locate one that matches the fixture name. If a page name match is found, then the page will automatically switch. This is a convenient way for the window to always show the shortcuts related to the fixture you have selected.
Set shortcut grid size (Columns x Rows) – Select this option to set the number of rows and columns you want to appear in the shortcut grid. This can be a useful option to set the on-screen shortcuts to match any physical hardware you are using.
Right click options
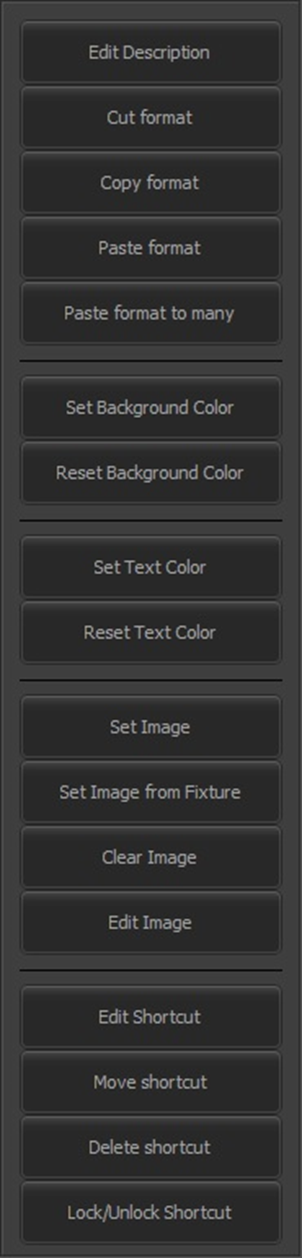
Right clicking on any of the active shortcuts will produce a pop-up menu that will allow you to edit the description and change the button and text color, add an image or jump directly to the appropriate edit window of the shortcut.
You can also use the popup menu to copy and paste the formatting (color, text color etc.) of the shortcut to other shortcuts.
NEO Notes & Tips: Changes made to the description or color will remain until the shortcut is reassigned.
Edit Description – Select this option to change the label displayed on the shortcut button.
Cut/Copy/Paste Format – These options allow you to copy and paste the background and text colors to other shortcuts. The “Paste format to many” option is a convenient way to set the colors of multiple shortcuts at the same time.
Background and Text Color – For every shortcut you can change the background color and the text color. To reset either of these to the default use the “Reset background color” and “Reset text color” options.
Images – Each shortcut can have an image assigned that will be displayed to the left of the label. The “Set image” option will allow you to select an image from your system by bringing up a familiar image selection dialog. Use the “Set image from fixture” option to select any of the images stored with the NEO fixture library.
Edit Image – The edit image option will open a paint window that will allow you to modify or paint any image you want.
Edit Shortcut – Select this option to open the editor window associated with this shortcut.
Move Shortcut – Upon selecting the move shortcut option, your mouse pointer will change to a small hand. Click on any unassigned shortcut to move the original to this cell.
Lock/unlock shortcut – A locked shortcut will remain on screen regardless of the page change. This is useful for keeping some operations on screen all the time.
Add Quick Command (macro) – If you right click on a shortcut that is not assigned, you will get a single menu item “Add Quick Command (macro)”. This is a special function that will allow you to assign a single command function to the shortcut key. You can think of this as a one-line macro that is assigned directly to the shortcut key. Clicking this option displays the following dialog:
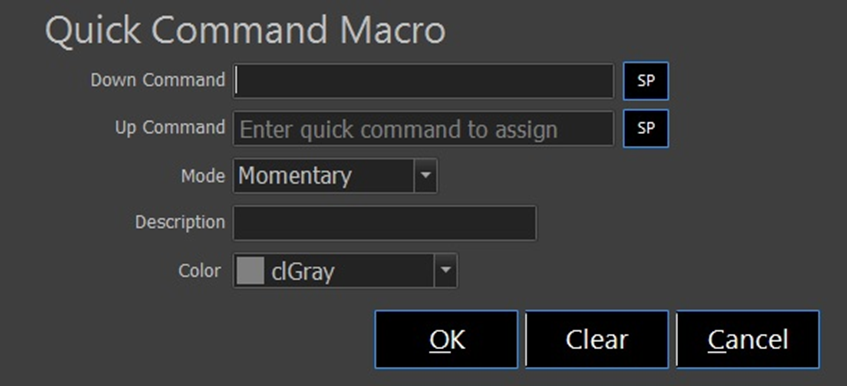
You can enter a separate command for the button down and button up operation if desired. The commands can be any valid command line text (You may want to test your command in the command line window before entering it here). The behavior of the button can be selected as either “Momentary” or “Latched”. Enter a description and click on the “OK” button to assign the new shortcut.
Clicking on the shortcut will cause the command(s) to be executed immediately in the command line window. If the mode is set to “Latched”, the first click will execute the Down Command and the second click will execute the Up Command.
Inject - The “Inject” command will cause any text following the keyword to be presented on the command line with the cursor positioned at the end of the line. Thus, you can create quick commands that prompt the operator for completion. When a space is required at the end of the command, you can use the underscore (_) character to denote the space character. An example would be a quick command defined as “Inject Record Cue_”. When the shortcut is activated, “Record Cue “ would appear on the command line waiting for the operator to enter the cue number to record and hit <ENTER> to complete the command.
Special Inject Commands
Inject {Fn} – When executed, triggers a function key, where n = 1 – 12.
Inject {^Fn} – Same as above for a shifted function key.
Inject {CLEAR} – Clears the contents of the command line.
The “Full Screen” button allows you to toggle the window into a borderless full screen mode. This can be useful when using the shortcuts page with a touch screen monitor. The window can be returned to its original size by clicking on the same button.