Cue List Grid

The cue list grid contains information about each cue such as its status, trigger mode, controls included, timing information, etc. The grid is highly customizable. The columns that are displayed can be selected from a list of available columns and they can be repositioned in relation to one another. Each column’s width can be adjusted as well as the row height. All these settings are remembered and will be restored each time the software is started.
Below is an expanded view of the left half of the cue list grid with the columns in default order.
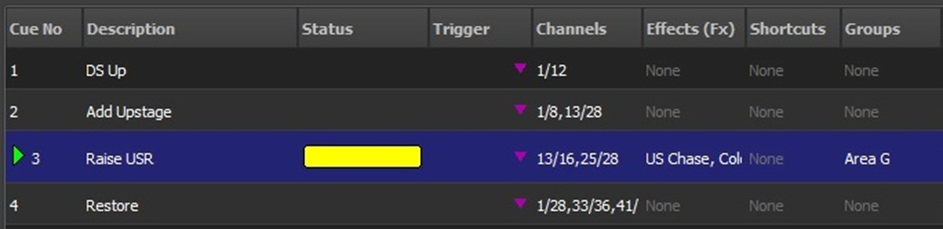
Cue Number |
The cue number represents the order that the cues appear in the list and by default also determines the run order of the show. Cue numbers can be set to any number you want by clicking within the field and typing the new value. If a cue is currently active, it is denoted by a green arrow to the left of the number.
Cue numbers must be between 0.000 and 4294966.999. When editing cues, it is not necessary to enter the decimal part if all you want is an integer value.
NEO Notes & Tips: NEO will automatically re-order the cue list as soon as you exit the field and thus save the new value.
The most common use for editing the cue number is to insert a new cue between two existing cues. To do this, change the cue number to a valid number between the two cues.
Example… To insert a new cue between cues 2 and 3, you would create a new cue and change its number to 2.5.
Description |
This field is for your own reference and provides the ability to describe the lighting state contained in the cue. This can be changed by clicking within the field and entering the new description. This field also displays cue-level blocking and marking flags.
Status |
The status field is in the form of a bar graph. When a cue is executed, the bar graph (in green) shows the progress of the Fade In/Cue Time. When complete, the graph turns yellow.
Trigger |
The cue trigger specifies what causes the cue to execute. By default, this is set to “Manual” indicating that the software is waiting for the “Go” button to be pressed. The previous cue will remain active until the trigger is activated.
To set the cue trigger, click the drop-down combo button to the right of the field and select from the following options:
§ Manual – The user must press a “Go” button either in a show runner or on this window (the trigger field is blank for this option).
§ Follow – Indicates that the next cue will be triggered automatically. If a “Follow Time” is not specified, the greater of the “Fade In/Cue Time” or the “Down Time” plus any Cue Delay time is used to determine when the Follow cue is executed.
§ Midi – The cue will be triggered by an external midi event occurring. See Options for information on setting up MIDI triggers.
§ Audio – The cue will be triggered by the line-in audio source. See Options for information on how to set up the software for audio triggers.
§ Timecode A/B – The cue will trigger when the specified timecode is reached. If the timecode has already passed when this cue is reached, the software will trigger the cue immediately. Enter the timecode value(s) into the field(s) provided.
§ Tempo – The cue will be triggered by the “Tap Tempo” engine.
NEO Notes & Tips: Several of the fields described below can be edited by using tabs shown in the details pane. See section Cue List Details Pane for more information.
Channels |
This field lists the channels (fixtures) included in a cue (as many as will fit in the width). The complete list can be seen in the Cue List Details Pane. You can use the “Add/Del” option of the details pane to enter the channels (fixtures) to be included or deleted.
Effects (FX) |
Effects are automated sequences of lighting states that run without user interaction. For more information and details on how to create effects, see section FX List Editor. A simple effect may be a traditional chase sequence, or a more complex effect may perform a series of moving light changes.
Often when a cue is executed, it is desirable to run an automatic sequence until the next cue is triggered. NEO allows you to add any number of effects and chases into any cue.
The “Effects (FX)” field is a non-editable field that will list the effects a cue contains (as many as will fit in the width). Use the “Effects” tab of the details pane to add, delete and modify the effects for the selected cue.
Shortcuts |
Each cue can execute any number of shortcuts when the cue runs. This allows you to run more complex operations such as executing macros, selecting channels, or jumping to another cue list. Use the “Shortcuts” tab of the details pane to add, delete and modify the shortcuts for the selected cue.
Groups |
By adding groups (specific palettes) to a cue you can set up “stage looks” that can be edited in one place and applied to any number of cues. The groups become building blocks for the show and can make programming the entire show a lot faster by reusing common “stage looks”. Use the “Groups” tab of the details pane to add, delete and modify the groups for the selected cue.
Below is an expanded view of the right half of the cue list grid with the columns in default order.
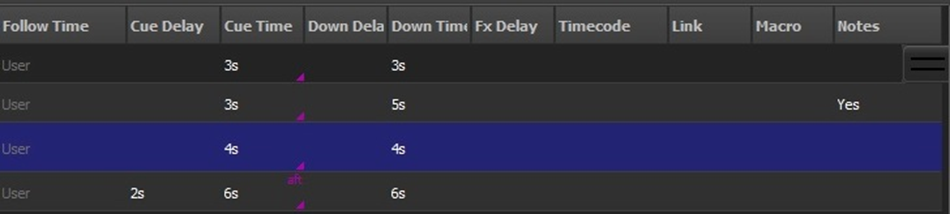
Follow time |
The follow time can determine when an autofollow cue is triggered in relation to the cue that precedes it. If an entry is made in this field, the next cue will execute in the time specified regardless of other cue time entries. See Trigger above for more information.
Cue Delay |
To specify a delay before the cue will execute, enter a valid time (in seconds) into this field. As an example, the delay can be used to wait for the previous cue to fade out before starting its fade in.
Cue Time / Fade In |
The time (in seconds) entered in this field begins when the cue is triggered. If the option “Use Fade Mode Up/Down (Off – In/Out)” in the “Show Defaults” tab of “System Properties” is Off, the time is applied to each channel to go from its current value to the value contained in the cue. If this option is On, then the time is applied to each channel that is increasing in value.
The fade time will apply to all fixture attributes that are set within the cue with the following exceptions:
§ An override fade time for individual channels has been set. See section on cue list details below.
§ A fixture attribute has been set to “Mark in zero time” in its profile.
§ Attribute family timing has been set. This is called complex timing which might be needed in rare instances to control fixture attributes more precisely. To set attribute family timing, click on the small magenta triangle in the lower right corner of the field which will display the following dialog:
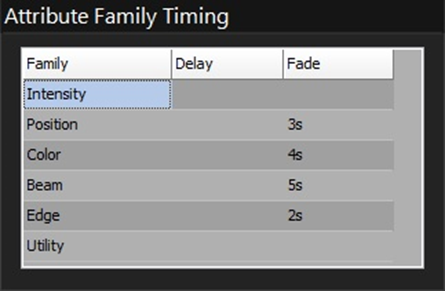
Enter values for delay time and/or fade time for the desired attribute families and click on another cell to close.
Down Delay / Dwell |
As noted above, this time plus the Cue Time/Fade In can be used to trigger an autofollow cue. If you are using Hybrid Tracking mode to record your show, the dwell time can be used also when you want the cue to operate automatically. For example, if you want the cue to fade in, wait for a specific time, and then fade out without any user interaction. The dwell time (in seconds) specifies how long the cue will wait after the fade in before executing the fade out.
Down Time / Fade Out |
The time (in seconds) entered in this field is subject to the following conditions:
Cue “Fade Out/Down” Applies to Outgoing Cue
Off – Use time in cue.
On – Use time in triggered cue.
Use Fade Mode Up/Down (Off – In/Out)
Off – Apply time to channels going out (i.e. intensity to level 0).
On – Apply time to channels whose intensity is decreasing.
Fx Delay |
To specify a global delay before effects are started, enter a valid time (in seconds) into this field.
Timecode |
When timecode triggers are being used, this field will specify the timecode value that the software will wait for. See Options for more information about timecodes.
Link |
The link field indicates what cue will run next and can be used to change the order that cues run. When this field is blank, the next numerically greater cue will be run.
In addition to this you can specify the number of times that a loop will occur and also what cue will be executed when the loop ends or the cue GO is executed.
For example, a cue can loop back to a previous cue and loop a specific number of times and then execute a different cue when finished. If the cue GO is pressed at any time through this loop, then the exit cue will be run. If no loop count is specified then the system will loop indefinitely, however pressing the GO will exit the loop to the specified exit cue.
To set the loop information enter the details with the following syntax…
{Cue number to loop to}, {Number of times to loop}, {Exit cue number}
Example…
4,10,8 | Loop to cue 4, 10 times and exit to cue 8
|
4,0,23 | Loop to cue 4, loop indefinitely and exit to cue 23 when the GO button is pressed |
Macro |
A simple command can be entered that will be executed when the cue is run. Multiple simple commands can be entered by separating each with a semicolon. Execution will be immediate when the cue is run. However, the command could be delayed by entering a “Sleep” command as the first to be executed (Example: sleep 4;12/24@50 – wait 4 seconds, then set channels 12 through 24 to 50%).
Notes |
Cue notes may be used to record any additional information about the cue that might be useful later. When the cue is run, a popup window showing the contents of the note will appear for the operator. Use the “Notes” tab of the details pane to add, delete and modify the note for the selected cue. A “Yes” will appear in this column for cues that have notes.