Introduction
Quick Start
Creating a New Show
Patching Some Fixtures
Live Channel Control
Recording Groups, Palettes & Submasters
Recording & Updating Cues
Adding an Effect
Saving the Show
Running a Show
Front Panel
Displays
Top Menu Bar
Selection Keys & Options
Selection Tool
On & Out
Home
Fan
Hi Light
Park
Undo
Release
Recording Buttons & Options
Groups
Palettes
FX Library
Copy
Command Line
Master Fade Time & Page Controls
Windows
Options Menu
More Options
New Show
Open File
Save & Save File...
Connect to remote
Backup Now
Task Scheduler
User Security
Reports
Patch
Patch Window
Command Line Patching
Drag & Drop Patching
Patch Detail Pane
Options Menu
RDM
Edit Menu
Soft Keys
MUTE Output
Visible Columns
Search Bar
DMX Outputs Pane
Fixture List Pane
Patch Encoders
Matrix Editor
Controlling Fixtures
Color
Selecting Channels
Intensity
Attributes
Releasing Channels
Channel Commands
Additional Channel Commands
Parking
Groups & Palettes
Groups & Palettes Editor
Group Details
Group Details Pane
Channels Overview Tab
Channel Grid
Matrix
DMX
Timing & Delay
Add/Delete
Palettes
Effects
Groups & Palettes Editor
Editor Grid
Editor Options
Select Active Button
New & Delete Group
Filtering
Group Mode Commands
Palette Types
Recording & Updating Groups & Palettes - Command Line
Record Group
Record Palette
Palette Windows
Generic Palettes
Effects
FX Playbacks
FX Editor
FX Editor
Creating new effects
Simple lighting chase
Timeline effect
Profile effect
Matrix Effect
Paint Box Effect
Media Playback Effect
DMX Recorder
Deleting an Effect
Effect Options
Effect Library
Effect Editor Controls
Recording Chases
Submasters
Cues & Cue Lists
Cue List Editor
Cue List Details
Cue List Editor
Cue Lists
Cue List Grid
Options Menu
Cue Options
Cue List Execution
Recording & Updating Cues - Command Line
Recording Cues - UI
Update Cue - UI
Cue Timing
Follow and Link
Copying & Moving Cues
Deleting Cues
Cue Execution Commands
Playbacks
Shortcuts
Snapshots
Magic Sheets
Macros
Blind
System Properties
System (DMX)
System Settings
Show Defaults
Network Access
Appearance
System Properties
Basic Mode Settings
Registration
Visualizer
Remote Options
Media Settings
Special Shortcuts
NEO Console Debug
Keyboard Shortcuts
External Triggers
MIDI
MIDI Control
MIDI Learn
Note Triggers
Note Velocity
Control Change Events
Timecode (MTC) / Clock
MIDI Show Control
Debug Messages
External Triggers
Line in
Timecode A & B
mySQL
Vision.Net
Contacts
OSC
ChilliNet
iCAN
Typing into the Command Line
Command Syntax Conventions
Saving & Loading Show Files
Programming Commands
Communication with external systems
Timing Commands
Software Updates
NEO Tips & Tricks
- All Categories
- Magic Sheets
- Editor Panel
Editor Panel

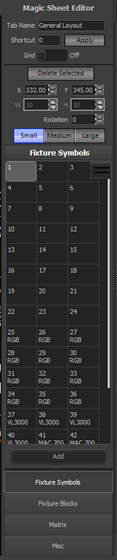
Tab Name – Shows the name of the currently selected tab. The name can be edited if desired.
Shortcut – Shows the currently assigned sheet display shortcut. The shortcut can be changed if desired.
Apply – Click on this icon to apply any edits made to the above.
Grid – Setting this switch to On will display a grid of dots in the layout area and change the behaviour of mouse moves to snap symbols to the nearest grid marks.
Fixture List – This is a grid of all the channels/fixtures patched into the show. An individual fixture may be selected by clicking inside its box or multiple fixtures by click and drag, <shift> and click or <ctrl> and click.
Add – Once you have selected the desired fixture(s), clicking this button will place the selection on the sheet. The type of graphic symbol displayed is determined by the symbol type set below:
Fixture Symbols – If this option is set when the Add button is clicked, the symbol for a channel is determined by what is set in the Fixture Type column in the patch table. If there’s no match for a given fixture type, the default symbol will be displayed.
Fixture Blocks – If this option is set, the selected fixtures will be displayed as rectangles similar to the Classic view with the difference that they may be arranged in any order on the sheet rather than in a grid. Multicell fixtures will show each cell as a small hexagon inside the block. A new feature of the Fixture Editor allows the default layout of the cells to be altered to better represent the arrangement of the cells in the actual fixture.
A new set of buttons will appear above the fixture list that provides options for placing and sizing the symbols on the sheet. The “Delete” button can be used to remove items from the sheet.
Matrix – If this option is set, a list of the available matrices will be shown instead of the fixture list. Select the desired matrix and click the Add button to add it to the magic sheet. See Matrix Editor for details on creating matrices.
Misc – If this option is set, a list of auxiliary objects that may be added to the layout will be shown. The objects available are:
Add Picture – Include a picture from a file on the sheet.
Add Text – Create a text box on the sheet which can be adjusted for size, font, and color. In addition to static text, special dynamic modifiers {DATE}, {TIME}, {ACTIVE CUE}, {ACTIVE CUE DESCRIPTION}, {macro variable name} can be added.
Add Group Box – Place a border on the sheet which can be adjusted for size and position plus line size and color. After the box is positioned on the sheet, select it, right-click the mouse and choose “Send to back” to allow objects enclosed in the group box to be selected.
Add Shortcut Button – When clicked, displays a dialog box where the desired shortcut number can be entered. The button will be added to the sheet and can be adjusted for size, position, font, caption and color.
Add Group Button – Similar to above but for creating a button with a group number.
Add SVG Graphic – Include a Scalable Vector Graphics object from an SVG file on the sheet. The fixture symbols shown above are examples of SVG objects.
Add Truss – Add a graphic representing a simple truss that can be sized and positioned anywhere on the sheet.
Add Shape – Shows a menu of simple geometric shapes that may be added to the magic sheet.
Sheet Panel:
After objects have been placed on the magic sheet, there are several operations that can be performed to arrange and size them. When an object is selected (outline changes to green), the editing options are shown in the Editor Panel above the channel/fixture grid. A typical edit block for the selected fixture is shown below:
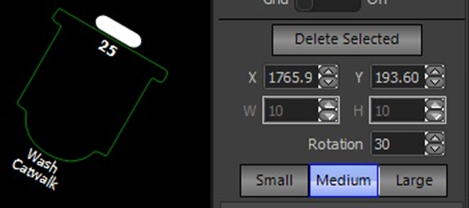
Delete Selected – Remove selected object(s) from the sheet. A confirmation dialog will be displayed.
X & Y; W & H – In addition to dragging the object on the sheet, its coordinates and size can be adjusted using the provided spin boxes.
Rotation – The selected object(s) can be rotated using this spin box. Positive numbers cause clockwise rotation and negative numbers cause counter clockwise rotation.
Size Buttons – The overall size (Small, Medium or Large) of the selected object(s) can be adjusted using these buttons.
Right Click Menu – While an object is selected, clicking the right mouse button will display the following menu:
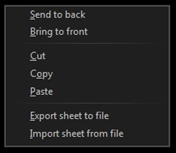
As objects are added and positioned on the sheet, they might obscure all or part of existing objects and prevent them from being selected. To access an obscured object, select the obscuring object, right-click and select Send to back. This will change the stacking order of the objects so that a previously obscured object can be selected and moved if desired. Selecting Bring to front will restore an object to its original stacking order.
As an example, if you surround some fixtures with a Group Box, the objects enclosed will not be selectable unless the group box is Sent to back.
Selected objects can be cut, copied and pasted as needed.
In addition, magic sheets can be saved by exporting them to a file (type .MSF). Exported sheets may be imported to a new layout as well. An imported sheet will always be added to a new tab and will not overwrite any existing layouts.